Showing posts with label tutorial. Show all posts

Monday, May 4, 2015

Makeover Week Day 1 - Change the Hair


I am in love with the Pure Innocence line from My Favorite Things. That little girl is so cute. Unfortunately she has nearly the same hairstyle in every image. Do you have the same hairstyle day in and day out? Do you ever use a curling iron? A straightening wand? A rounded brush?

I didn’t see myself in her image. I have long, naturally curly hair. Sometimes I wear my hair up, sometimes not, but it is never straight. I wanted the Pure Innocence girl to look more like me, so it was time for that little lady to get a makeover.

Tools I used:
  •      My favorite things stamp of your choice
  •      Acrylic block
  •      Black Ink
  •      Standard copy paper
  •     Tracing paper or vellum
  •      Pencil
  •     Cellophane Tape
  •     Card stock for your project
  •    Black fine line marker, I used Copic multi-liner .03
  •   Erasure

How to get your look
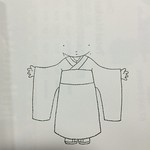
  1.  Stamp your image on standard copy paper.
  2. Cover image with tracing paper or vellum, and draw the hair you like.
    Testing Hairdos
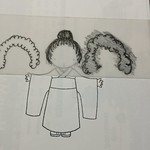
  3. Turn the tracing paper or vellum over and lightly scribble over the lines you drew.
  4.  Clean and dry your stamp. Cover the hair on the stamp image with tape, making sure the tape goes beyond the image. 
    Makeover Week Images - step 1
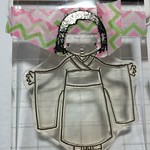
  5.  Ink up your stamp. The tape will be very inky. Carefully remove and discard the tape.
  6.  Stamp your image on your card stock. Doesn’t she look odd with the top of her head gone?Makeover Week Images
  7. Put the tracing paper or vellum, drawing side up – scribble side down, where her hair should be.
          Makeover Week Images
  8.  Lightly trace your drawing of her hair. 
  9. Remove the tracing paper or vellum.
  10. There will be faint pencil line where you traced.
       
    Makeover Week Images
  11.  Get out your fine line marker and trace again. You can add more detail at this point if you like. When the ink is fully dry erase any pencil marks remaining.
  12. Color your image as you normally would. Keep in mind that if you are using Copics or watercolor the pen you use to draw with will make a big difference, test before you color.
Voilà! She now has a new do.

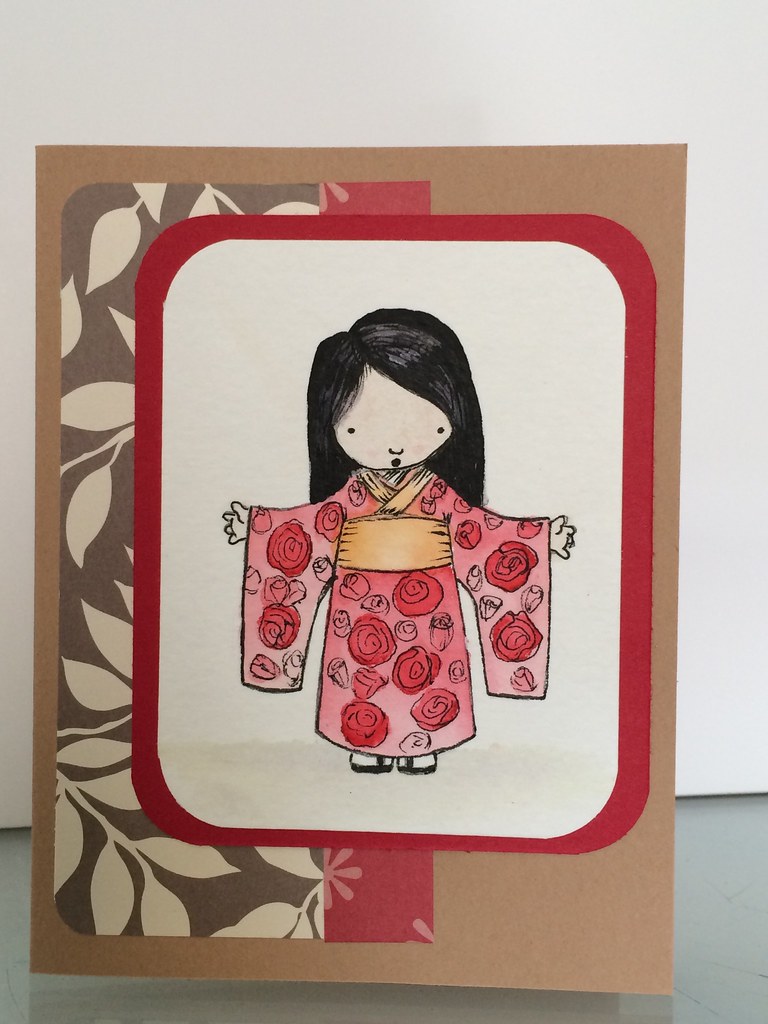
The whole idea of having her wear different hairstyles came from a black smudge on her forehead. I didn’t want to waste the coloring I had done or the patterned paper that made her kimono because of a stupid smudge, so I gave her bangs. That particular image had black hair so it was fairly easy to do. 


Why use vellum or tracing paper you ask? Because when you first get started proportions can be difficult. I tried to just draw the hair but she ended up looking really weird. Having a reference is a good thing.

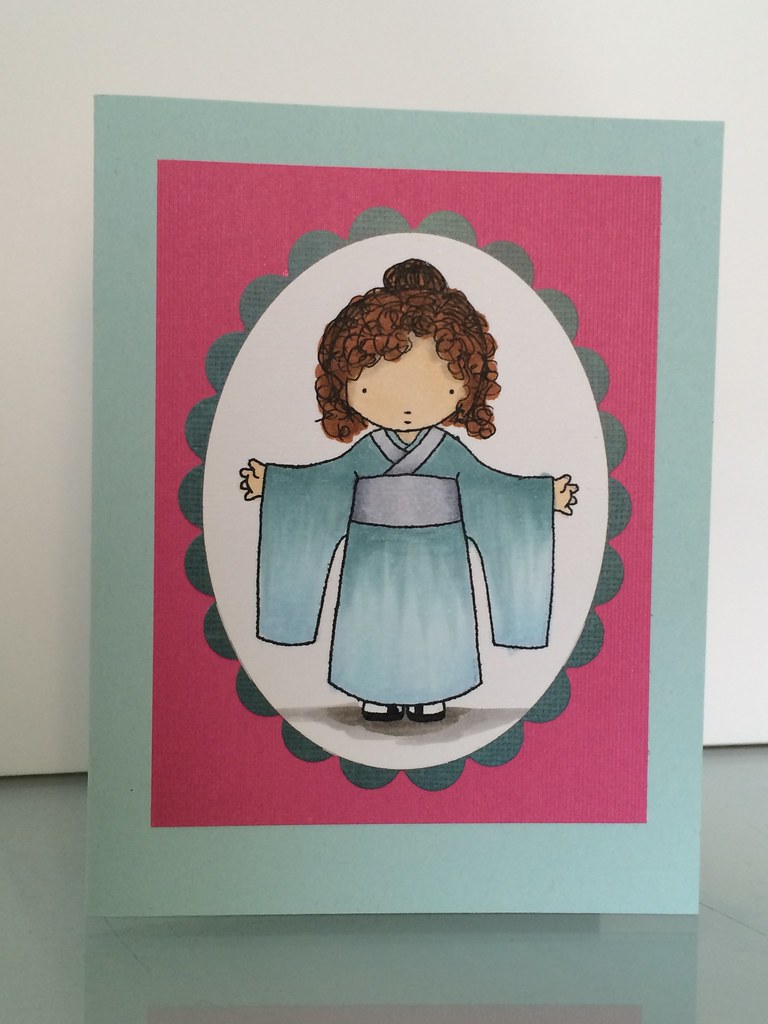
Here are other Pure Innocence Good Fortune image with new hairdos.

Makeover Week Day 1
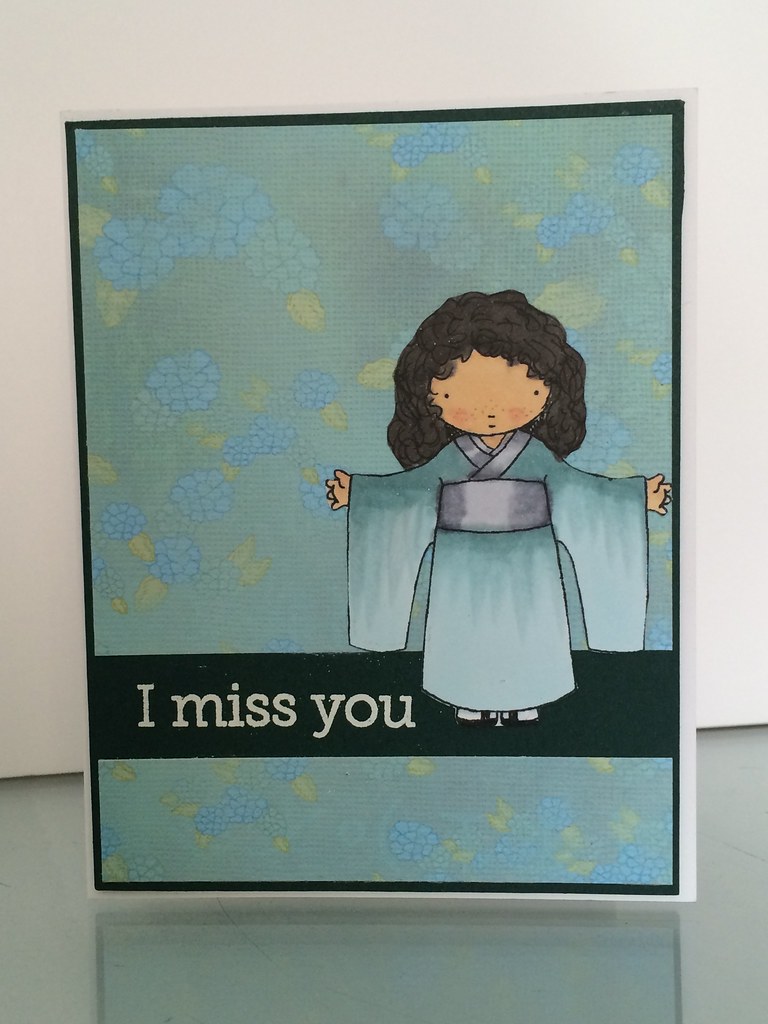
Those streaks were intentional. It's not bad Copic coloring.

Makeover Week Day 1

Makeover Week Day 1

Makeover Week Day 2 - Hold On

Happy Crafting,

Friday, May 18, 2012

Seed Packet Party Favor Tutorial or How to Make a Potted Elephant

Preface: Apologies for the blurry photos. My camera died and I am not the best iPhone photographer yet. 
In March I was asked to make party favors for a baby shower. I didn't know the mother to be so I took a look at her registry for color clues, searched the internet for inspiration and talked to the requester for guidance. What I came up with celebrated the mother's love of animals (invitations featured a giraffe), the St. Patrick's Day shower date, and the sweet pea soon to be born.

Seed Packet Party Favor Tutorial


Consumables:
  • 2 sided 12"x12" Cardstock (paper may work but card stock is sturdier and will work better)
  • 6" Wooden Craft Stick
  • Crafty Power Tape (or Sticky Strip or good glue)
  • Packet of Sweet Pea Seeds
  • 4" Terracotta Pot
  • Ribbon
  • Stamps or stickers for decoration
  • Gold wrapped candies

Tools:
  • Paper Cutter
  • Martha Stewart scoring board (nice but not necessary) 
  • Metal straight-edge and X-acto  (or paper snips)
  • Circle punch (1" to 1.25" works best)
  • Tim Holtz Idea-Ology Tiny Attacher
     (if you don't have this handy tool you can use hot glue. I have not tested hot glue but it should work fine.) 


Step 1: Trim 12x12 paper to 11.25" x 5.5" 

Step 2:  Place the paper with the pattern you want showing on the outside of your project DOWN. Score with a heavy hand at 3 5/8", 7 1/4" and 10 3/4". Lightly score or draw a light line at 5 3/8" I chose to score so I could see the line from both sides of the paper. This is important in the next step. 


Score one more line 1/2" from the bottom.

Click on the template caption below to download the pdf.  Note: the template was created to actual size, if printing on 8.5" x 11" paper you will need to follow the measurements, not the lines.


Click here to download.


Step 3: Cut and Punch
Cut along the bottom score line until you get to the third panel. Cut from the bottom of the third panel up to the score line. Cutting at an angle makes the final product look nicer. Remove the section below the score line on the small fourth panel as well, again cutting at an angle improves the look of your final project. Also remove the top of the small fourth panel by cutting at an angle.


Fold the at the 7 1/4" score line so the second and third panels are together.


With the second and third panels folded together, line up the center of your circle punch with the lightly scored line in the middle of the second panel. Punch through both sheets of paper at the same time.


Step 4: Stick it
Open the folded pieces and place the 6" wooden craft stick on the lightly scored line and staple with your Tim Holtz Tiny Attacher, making sure the pointed edge of the staples are facing IN.
 

I put the Tiny Attacher in the notch I had just make and went as far down as I could and stapled, then I stapled again at the bottom. Those little staples go through your craft stick and the cardstock surprisingly well.  If they prongs of the staple are sticking up at all pound them down with a craft hammer.

If you are going the hot glue route put the glue on so the stick is only on about 2/3 of the paper. You want a few inches of the stick to come off the bottom of the cardstock.


Step 5: Adhere
Turn your cardstock over so the stick is facing down. Fold up the bottom flap and the fourth panel or right flap. Put your Crafty Power Tape (or Sticky Strip or good glue) on the these two pieces. Fold the third panel over and adhere to the second panel. 

The third panel is narrower than the second so there will be a small bit on the left. This helps when you fold the first panel over the seed packet.

Step 6: Decorate
The next step is decorating the card. I used the Silhouette to print and cut an embellishment that said "Thanks for joining us" for the cover. The ribbon was added next. I used the Crafty Power Tape to adhere the ribbon to the back. Then I added the little elephant, which is an image from Hot Off the Press. I cut the shape out with the Silhouette using the technique described in the Lazy Snipper tutorial I wrote last January. I colored him using Copics in colors that matched colors in the baby registry.


I printed out the sentiment "Please plant these seeds and watch them bloom. Just like the baby that will be here soon!" for the center. I'm not sure which website I found this on but I made sure I bought sweet pea seeds because they seemed most appropriate for a baby.

Put your seed packet in the pocket. Tie up your ribbon and place them in the the pot. Fill your pot with candies which will help your packet stand up.

Happy Crafting,

Tuesday, March 20, 2012

How to Find the Center of Spellbinders Dies

Sometimes I need to know how large a Spellbinders die is and sometimes I want to know where the exact center is. I could eyeball this but I am a bit of a perfectionist, control freak, geek (you pick the description) and would prefer to have a permanent guide on my dies. I've figured out how to do this once and for all and thought I would share it with you. 
 
How to Find the Center of Spellbinders Dies
You will need 
•  a Spellbinders die with a symmetrical shape
•  your die cutter (I use a Cuttlebug)
•  a piece of copy paper
•  a thin point, permanent marker (I used a Sharpie)

Cut the shape out of copy paper.
 
Fold the paper in half.
 
Fold it in half again. Make sure you have a nice crisp crease.
 
Unfold the paper and put it back inside the die. Turn the die over so you don't see the cutting edge.
 
Use your marker to draw four lines on the edge of the die that line up with the four folds on the paper.

Take the paper out and refold it along one of the creased lines. Measure the width of the paper along that creased line. This is the size of your die, write it directly on your die and you will never be guessing again.

When you want to line up the die with text in the future you have a guide. When you want to cut a half or quarter of the design you have guidelines.

If you need to find the shape's center all you need to do is get out a pencil and a ruler. With the paper still in the die, line up the ruler with the guides and draw a faint line near the center. Repeat with the other 2 guide lines. Where the two lines intersect is center.

Happy Crafting,

Tuesday, March 6, 2012

Change Your Silhouette's Mood

I'm working on several new tutorials for this week but I keep getting distracted by life. So I thought I'd throw out a quick tip that I stumbled on. It will not help you create anything, but it may change your mood. It will definitely change the view of your screen.  
I've chosen pink for my Silhouette window.
There is a little color wheel on the bottom right side of the Silhouette window that changes the color of the border of your Silhouette window and your highlight colors. 

I could just as easily choose teal.
Change the color when the mojo wanes and see if if helps. Change the color for different holidays. Change the color to match your brand or your mood.

Happy Crafting,

Tuesday, January 24, 2012

Silhouette Studio Printable Pattern Basics Tutorial

Today's video tutorial covers Printable Patterns with the Silhouette Studio software. Each feature is covered and there is a bit of magic at the end. If you would like to see a larger version click here.

Unable to display content. Adobe Flash is required.

If you would like to see a larger version click here.
Happy Crafting,

Tuesday, October 18, 2011

How to make a Convertible Halloween Wreath

and Connect with your Kid.
Step 1. Turn off the Television.
         Nothing kills a kid's concentration, or a joint creative project, like a television blaring in the background. There isn't a show on television more important or interesting than your kid, just turn it off.
Step 2. Gather your Supplies.
         14" Styrofoam Wreath Form
         A couple of yards of orange Burlap
         Mod Podge (outdoor)
         Hot Glue Gun
         Hot Glue Gun Helpers (if you don't have these tools use a bit of tin foil and the erasure side of a pencil)
         heavy duty cardboard - thick cereal box works well
         T-pins
         Crop-o-dile or other hole punch
         Pencil
         Silk Flowers (we found inexpensive black roses with silver glitter on them at Micheal's)
         Silhouette (or a pair of scissors and some alpha stickers)
         Adhesive
         Twine or ribbon
         Picture hanging 

Step 3. Cover the Wreath Form.
         We got burlap because ribbon, even on sale, was a bit too expensive. We cut it into 2" strips and wrapped it around the form. We added a bit of Mod Podge Outdoor to the form every few inches to adhere the burlap. The ends were pinned down with T-pins while the Mod Podge was drying.


Step 4. Create a Floral Addition
         I didn't want to have to make a whole new wreath for Thanksgiving. I wanted to be able to switch out the Halloween decorations for a fall/Thanksgiving feeling fairly easily so we made a floral addition.
         We traced a portion of the wreath on a piece of sturdy cardboard and cut it out. Then pushed T-pins through the cardboard at the ends. We used the smaller end of the Crop-o-dile to punch holes in the cardboard, cut the roses off the wire. We put a glob of hot glue around the holes and put the rose's stem through the holes. We turned the cardboard over, bent the stem down to the cardboard and adhered with more hot glue.
         While using the hot glue we discovered a great way to make spider webbing.

Step 4a. Make Spider Webbing

Step 5. Make Banner
         I let my son chose the words and font for the banner. He chose "BOO!" "EEK!" for the words and we cut the letters, face and banner pieces out of long-retired Stampin' Up patterned paper with the Silhouette. If you don't have a Silhouette or Cricut you can cut out the banner pieces with scissors and use alpha stickers for the lettering. We used regular glue on the paper and googly eyes
         Put a T-pin in the back of the form but don't push it in all the way. Wind the twine around the post of the pin a few times then push the pin into the form pinching the twine between the form and the top of the T-pin. Pull the twine across the front of the wreath where you want the banner to be and repeat the T-pin winding process on the back of the wreath.  Repeat as many times and you like keeping in mind the size of your banner pieces.
          We used hot glue on the banner pieces but any adhesive will work.


Step 6. Adhere Floral add on
         Push the pins on the back of the floral add on after your banner has been placed on the wreath.

Step 7. Get ready to hang
         We adhered a sawtooth picture hanger to the back of the wreath by pushing T-pins into the holes on the hanger. Makes it easy to move the hanger if it's poorly positioned too.

Step 8. Hang and admire
         I don't really have to explain this step do I?

After Halloween we will take the Halloween banner and flower add on off and add Thanksgiving decorations to the wreath.

Supplies


 Happy Crafting,

Monday, May 9, 2011

Silhouette Video Tutorial - Creating a Chalice or Wine Glass


My son received his first communion last weekend and he needs to send thank you cards for the gifts he received. I wanted a simple, elegant, easy to reproduce design.

I chose a burgundy background, which looks a bit like alter wine, with a chalice and host for the image. I really like the look of a thin line around the inside of a card. I could get that look from the Papertrey Ink Framed stamp set. Unfortunately I didn't have the time or money to purchase the set so I improvised. I could have marked each card off with pencil marks and using a straight edge drawn the border with my gold pen. But I am a bit lazy and I had a lot of cards to make so I made a template. I used a bit of stencil material and glued it to a piece of chipboard making sure a bit of the stencil hung off the chipboard on all sides so ink would not bleed under the template.

The template makes creating that frame quick and easy. I figured out where I wanted the sentiment and put a couple of marks on the template as a guide. Then I put the template down on the card and ran the pen around the edge making sure I didn't go into the sentiment area. Then putting the sentiment exactly where I wanted it was even easier.

The host was simply a bit of vanilla card stock punched with a 1" circle punch then I stamped a lower case "t" in the center. The chalice was created on the Silhouette and the video link below shows you how to make it yourself.

Unable to display content. Adobe Flash is required.

To see it larger go to: my Screencast.com Site

The particulars
Paper: Stampin' Up! Bravo Burgundy, Very Vanilla and Paper Source Gold
Stamps: Stampin' Up! ABC Alphabet Lower, Studio Calico "Thank You" Ink: Versamark (with Gold Embossing powder), Zig Painty Gold paint pen, Distress Ink in Antique Linen
Embellishments: Dimensional (under host)

Happy Crafting,

Saturday, March 5, 2011

First Video Tutorials - Using Offset in Silhouette Studio

Welcome to my first video tutorials on how to use the Silhouette. These are simple screen casts on basic functions of the Silhouette Studio software (v 1.5.0). If you don't have the latest software you can download it free from the Silhouette America website. My previous tutorial The Lazy Snipper or Feeling Like a Genius talked about using offset on images but didn't go into depth on the subject. Hopefully a video will help those who had questions. Like I said this is my first attempt so be patient with me.

Offset on Text

Unable to display content. Adobe Flash is required.
For a larger video use this link: 2011-02-27_SilhouetteOffsetText


Offset for Art

Unable to display content. Adobe Flash is required.
For a larger video use this link: 2011-02-27_SilhouetteOffsetArt


Now for something completely different

One of the things I am planning on DOING soon is donating all the unsold stamp sets that are in my Etsy shop. Memories and Beyond, our not so local but oh so awesome, scrapbook store collects scrapbooking/stamping supplies for use in art therapy at Mooseheart Child City and School. Mooseheart is a community and school for children and teens in need, located 38 miles west of Chicago. I will be donating the stamps and some inks on my next visit, tentatively scheduled for March 26th. If you have any interest in purchasing any of these sets now is the time.


Happy Crafting,

Tuesday, February 8, 2011

DIY Doilies or How Cool is the Replicate Tool

Punching buttons and pulling levers to see what will happen makes me happy. (You'd think I'd like slot machines but losing money makes me unhappy but that's a story for another day.) I also like to play with software to see what if will do and those icons on my newish Silhouette needed investigating. In the course of my investigations I learned a few things made a couple of discoveries and I thought I'd share them with the world, or at least those of you kind enough to read my blog.

First things first I am using the Silhouette Studio software version 1.3.0. If you are using an older version consider upgrading, this version can do some pretty cool things.

Introducing Mrs. Armot
The tools I will be discussing today can be found in the upper right hand corner of the Silhouette window. I wanted to show you what they look like because I figure some of you are probably visual people like me. When I started labeling the icons I realized they spelled out Mrs. Armot and so I have named my Silhouette Mrs. Armot. Say hello everybody.

The functions behind the icons are:
M1 - Move | R1 - Rotate | S - Scale
A - Align | R2 - Replicate | M2 - Modify | O - Offset | T - Trace

I was comfortable with many the icons in this software from the very beginning because they are similar to icons in other programs I use. Rotate, Align and Scale didn't require too much investigation. 

But what the heck was replicate and how do you use it. Well Duplicate would have been a good term too because that is one of the functions hiding under this icon. Not only can you duplicate up, down and side to side with this tool but you can also make rows and columns. (See the DIY Stencil tutorial I posted here.) Be the tool wonder we will be investigating today is Rotate 5 copies. I understood the Rotate One Copy - great if you want the same image copied and turned 90° on the center axis of the image you already have.

But why would I want to do that 5 times. It seemed insane. I tried it with a few of the images that come with the machine. I tried it with the second leaf image and it took that lovely branch of leaves and turned it into an overgrown forest. It just looked like a mess. Then I tried it with the third frame (see highlighted image below) and I understood the power of this tool.


I had an interesting shape, something akin to a doily. The center was open and it needed to be welded together but it looked like a doily.
 
I added a simple circle so the center would be solid, use the Align tool to Centralize everything (aka center all) and welded everything together and got this.
 
I cut it out of vellum and put it on a card.  


If I make a doily again I will not be using vellum OR I will not be adhering it around the edges. I don't like the way the adhesive shows through but the nice thing about making your own doilies is that you can make them any color you want as often as you want.

I experimented with other shapes and discovered that you need a open, symmetrical shape to make it work. I discovered that if you copy the image and scale it down to the size of the center circle in the doily above that it's a fairly complex and beautiful design.

I also discovered that I need to spend a bit more time learning all the ins and outs of the Modify too. Welding some shapes didn't work and I got a large solid so I will keep experimenting

When I play in new programs I find things that I'd like to see improved. If the folks at Silhouette America are reading this maybe in version 1.3.1 you could 
  1. make it so user can determine the point they want to Rotate/Replicate images from. I would love to be able to click on the edge of an image and rotate 5 times. 
  2. give us the ability to Flop an image with one button so we can draw one wing, flourish or whatever and get the second one in a flopped, or flipped if you like, orientation by hitting one button.

So let's see your   DIY doilies.
The particulars
Paper: Ruby Red Stampin' Up! paper
Stamps: Free Papertry Ink tag, colored with Prismacolor pencils and Gamsol, Italian Poetry background stamp from Hero Arts.
Embellishments: DIY Doily, Sentiment printed from computer.

Happy Crafting,

Monday, January 31, 2011

What will the Silhouette cut next?

I like to push my tools to the limits to see what they can do.

I put things through my Cuttlebug that the creator never anticipated: leaves, yarn, Fiskars texture plates, plastic canvas, basically anything with a texture. Well the Silhouette is no different. I cut a few things out of paper and then thought, "Let's test this bad boy and see what it can do."

I saw a great layout by Julie Fei-Fan Balzer and wanted a stencil of large dots too. Because I was in a hurry I just looked at her pictures and skimmed the text. I didn't notice that the stencil she was using was  a *new* soon-to-be-released-at-CHA stencil from The Crafter's Workshop!

I tried to make one with my Silhouette and succeeded! But this is a cautionary tale.

I made a 3/4" circle, easy enough and then used the replicate tool's Column of Four a couple of times, then spaced things out a bit. Then with the entire column selected I used Row of Three a couple of times, and spaced the columns out.

I used the Plaid Simply Stencil material and it didn't cut through. I got out another sheet and tried it again but this time I clicked on double cut and VIOLA! I have a large circle stencil. Of course it's not 12 x 12 but it'll do.

Now on to the cautionary tale bit. The blade still cuts, but I don't think it cuts as well. It looks like it's tearing card stock instead of cutting it. I needed a pair of scissors and decided the best kind material for a pair of barber shears was tin foil. I was also hoping that the foil might sharpen the blade. I used my Xyron to put an even layer of adhesive on a piece of black card stock then adhered it to a piece of tin foil. The paper under the foil on the scissors isn't really cut through. I had to really work to get the circles out of the handle. I should have double cut this one as well.

Didn't work really so I guess I need to buy a new blade.


So if you really want to make a stencil, you can with the Silhouette. You can make a stencil of anything you can dream up. But be forewarned that you will be dulling the blade quite a bit.


For those who would like to see the full page here you go.

I like this page for several reasons.
1. It's finally done.
2. I got to use the Silhouette.
3. I got to use PINK on a boy's page. It's the hairdressers tape that I used on his bangs when I gave him that first cut. It's able to be repositioned and it's easy to write on.
4. It contains my son's actual hair.

So now on to the question of the day. Should I add the boy's age on the page or is the date enough?

Happy Crafting,