
Preface: Apologies for the blurry photos. My camera died and I am not the best iPhone photographer yet.
Seed Packet Party Favor Tutorial
 Consumables:
Tools:
Seed Packet Party Favor Tutorial
 Consumables:
- 2 sided 12"x12" Cardstock (paper may work but card stock is sturdier and will work better)
- 6" Wooden Craft Stick
- Crafty Power Tape (or Sticky Strip or good glue)
- Packet of Sweet Pea Seeds
- 4" Terracotta Pot
- Ribbon
- Stamps or stickers for decoration
- Gold wrapped candies
Tools:
- Paper Cutter
- Martha Stewart scoring board (nice but not necessary)
- Metal straight-edge and X-acto (or paper snips)
- Circle punch (1" to 1.25" works best)
- Tim Holtz Idea-Ology Tiny Attacher(if you don't have this handy tool you can use hot glue. I have not tested hot glue but it should work fine.)
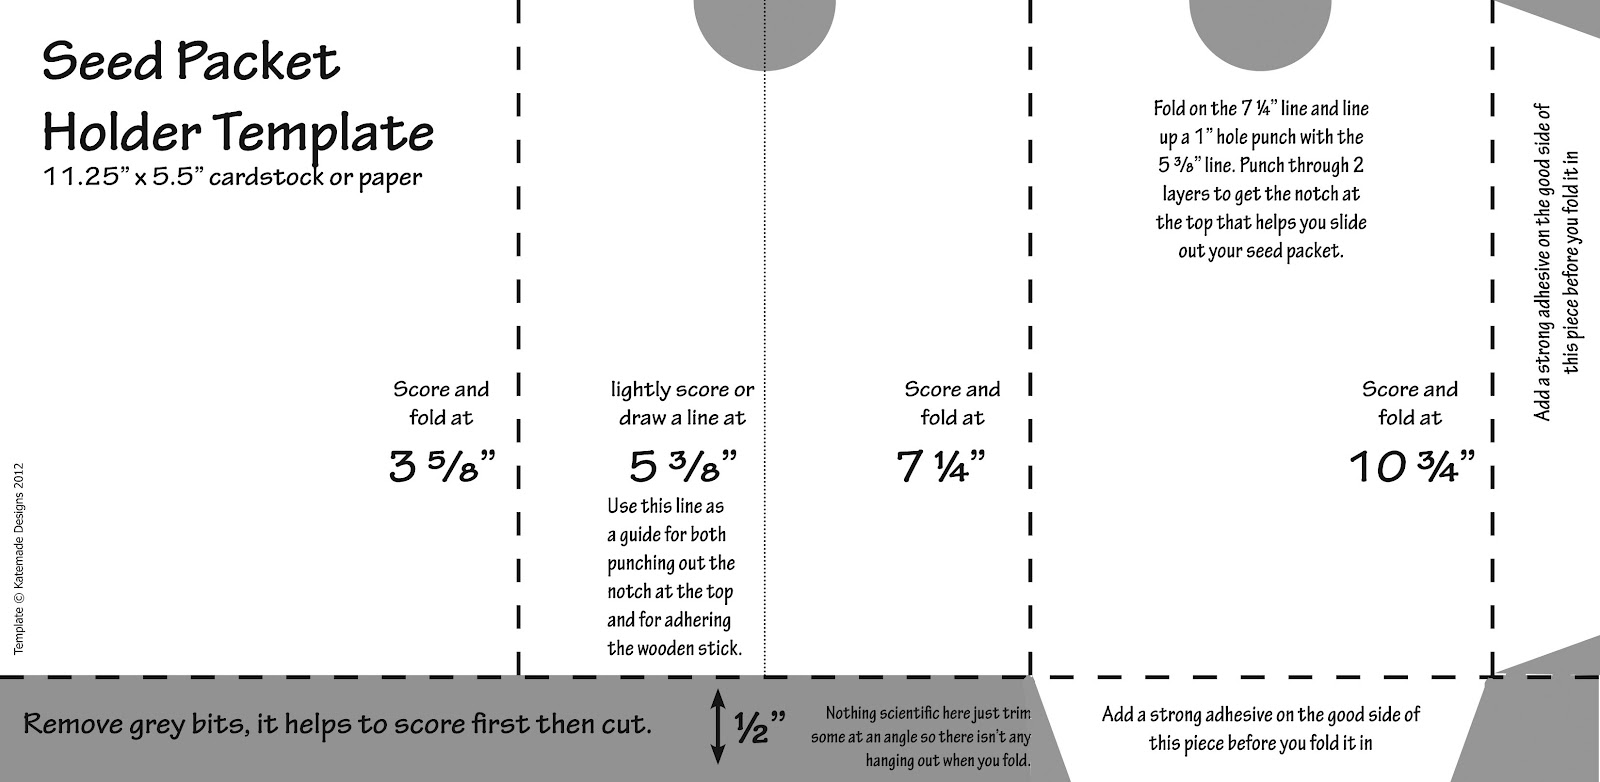
Step 1: Trim 12x12 paper to 11.25" x 5.5"
Step 2: Place the paper with the pattern you want showing on the outside of your project DOWN. Score with a heavy hand at 3 5/8", 7 1/4" and 10 3/4". Lightly score or draw a light line at 5 3/8" I chose to score so I could see the line from both sides of the paper. This is important in the next step.
Score one more line 1/2" from the bottom.
Click on the template caption below to download the pdf. Note: the template was created to actual size, if printing on 8.5" x 11" paper you will need to follow the measurements, not the lines.
 |
| Click here to download. |
Step 3: Cut and Punch
Cut along the bottom score line until you get to the third panel. Cut from the bottom of the third panel up to the score line. Cutting at an angle makes the final product look nicer. Remove the section below the score line on the small fourth panel as well, again cutting at an angle improves the look of your final project. Also remove the top of the small fourth panel by cutting at an angle.
Fold the at the 7 1/4" score line so the second and third panels are together.
With the second and third panels folded together, line up the center of your circle punch with the lightly scored line in the middle of the second panel. Punch through both sheets of paper at the same time.
 Step 4: Stick it
Open the folded pieces and place the 6" wooden craft stick on the lightly scored line and staple with your Tim Holtz Tiny Attacher, making sure the pointed edge of the staples are facing IN.
I put the Tiny Attacher in the notch I had just make and went as far down as I could and stapled, then I stapled again at the bottom. Those little staples go through your craft stick and the cardstock surprisingly well. If they prongs of the staple are sticking up at all pound them down with a craft hammer.
If you are going the hot glue route put the glue on so the stick is only on about 2/3 of the paper. You want a few inches of the stick to come off the bottom of the cardstock.

Step 5: Adhere
Turn your cardstock over so the stick is facing down. Fold up the bottom flap and the fourth panel or right flap. Put your Crafty Power Tape (or Sticky Strip or good glue) on the these two pieces. Fold the third panel over and adhere to the second panel.
The third panel is narrower than the second so there will be a small bit on the left. This helps when you fold the first panel over the seed packet.
Step 6: Decorate
The next step is decorating the card. I used the Silhouette to print and cut an embellishment that said "Thanks for joining us" for the cover. The ribbon was added next. I used the Crafty Power Tape to adhere the ribbon to the back. Then I added the little elephant, which is an image from Hot Off the Press. I cut the shape out with the Silhouette using the technique described in the Lazy Snipper tutorial I wrote last January. I colored him using Copics in colors that matched colors in the baby registry.
I printed out the sentiment "Please plant these seeds and watch them bloom. Just like the baby that will be here soon!" for the center. I'm not sure which website I found this on but I made sure I bought sweet pea seeds because they seemed most appropriate for a baby.
Put your seed packet in the pocket. Tie up your ribbon and place them in the the pot. Fill your pot with candies which will help your packet stand up.

Happy Crafting,

1 comment:
This is a very clever idea, Katie! I really like this and am going to bookmark it. :)
Post a Comment