Wednesday, October 31, 2012

Pinterest inspiration follow through


Halloween Sodas
Originally uploaded by Kalyber

How many pinterest boards do you have? How many pins are on those boards? How many times have you actually used that inspiration to make or do something?

I admit it I am a pin hoarder. I have tons of great ideas pinned on my boards and today I finally made something I saw on Pinterest.

Today I got an email asking us to bring something to a cut scout Halloween party and I knew I was going to make a orange soda pumpkin I had seen. I went to the grocery store and got a couple of bottles of orange soda and then realized that there are guests that drink Coke, Pepsi and Root Beer too so I got those too.

My son and I figured out which images to put on the bottles with dark liquid. We had to keep it to white because that's the only other color of vinyl I had. I had a skeleton shape I purchased last Halloween and used that for the Pepsi and Coke. We then purchased a ghost because I was being lazy.

We made sure to put the name of the soda in the vinyl design because once the caps are off no one would be able to identify their favorite.

Happy Crafting,
Katie

Wednesday, October 10, 2012

BTS How I make video tutorials

I have dreams for this blog. I made plans to achieve those dreams. Then life smacked me across the face and said, "Not now you fool!" in a strange accent. And I went back to being a voyeur instead of a contributor to the blogosphere.
I had planned to blog at minimum 3 times a week but was shooting daily with Sunday's off. If you  look at the dates in the archive on the lower right hand side of this page you will see how well that's been working out for me. Work and motherhood and Cub Scouts and teaching Sunday School and grief (we buried my father this past weekend) are taking their toll on my brain, energy, and craft/blog time management.
I wanted to have a weekly tutorial on Tuesdays. Showing people how to use their Silhouette Studio software. I have oodles of ideas but a video tutorial takes a lot of time to produce for me. I am not comfortable with a seat of the pants lesson when a camera is rolling. I can do one on one teaching without prep but not a video.
So instead of having a tutorial for you. I decided to show you my process for putting together a video tutorial.

Step 1 - Come up with an idea for the tutorial.

This may seem like a duh but it really is an important step. If I decide to do a tutorial that involves using the drawing tools in the Silhouette software (coming soon) the viewer will need some background knowledge like how vector graphics work. So instead of producing a drawing tools video I first need to make a video about the difference between raster and vector graphics.  I also need to figure out a good way to show the information visually and quickly. I may have to set up a few documents to make the video go more smoothly. Unless it is pertinent I don't want you to waste your time watching me make make a document with a bunch of boxes with type under them like the one I used in the tutorial Using Digi Papers with the Silhouette.
I think about a specific reader when I am putting together tutorials. For the last video it was a friend who asked specifically for clarification on the whole raster vs. vector issue. Most times it is Anne Krause, a lovely woman I met at a crop, who had a lot of questions about how to use the Silhouette she had just purchased. She took down my blog address and said she would follow me to get tutorials. Thanks for following me Anne and making me feel like I can be helpful, oh and happy belated birthday too.

Step 2 - Take one, talk it out.

Most of my tutorials are screen captures of the Silhouette Studio software. I use Camtasia for Mac and record what is on screen as I talk through it.  This first run through is incredibly rough as I am just talking off the top of my head about the subject.
After I record it I generally take a break. I may go get a glass of water or go to the bathroom or do some small task away from the computer or I may not return to it until the next day. Even a short 5-10 minute break is really important, I have dug right back in without it and I became weary with subject overload.

Step 3 - Script writing.

I play the video back and listen to how I sound and where the information seems weak. I scribble an outline of bullet points as I am listening, pausing frequently to add notes of information that I feel is missing. I am getting over the cringing when I hear my voice, I credit that mostly to Mel McCarthy who complimented me on my voice, that meant so much to me as no one had ever done that before.
Using my outline I begin typing up the script. I will play the video and type along with it trying to get it as close to the original casual conversation as possible. I pause the video frequently to add information.
If I don't script it out the next time I record I forget stuff, I ramble on and go over my target time. I'm always shooting for less than 10 minutes. Before I purchased Camtasia I was using the free screen capture program Jing and there was a five minute limit so keeping my video on point was really important. 

Step 4 - Final shoot

I always have a glass of water and a tube of Vaseline or Chap-stick on the desk so I hydrate then moisten my lips before I begin. Makes a world of difference because I need multiple takes of the first sentence, it's a killer. Once I have that down I generally can get through the whole video with only one take. 
If I am recording on the computer the script lays on the desk in front of me.
If I am working at my drafting table I tape the script to the ink holder and rubber band my iPhone to my regular camera that is on a flexible arm clamped to my bookcase.  I tried recording with my regular camera, the picture was great but the audio was horrendous.

Step 5 - Editing

Editing is so much fun. I love mixing elements, adding music and sound effects, text and other effects. I try not to get too crazy, I don't want the point of the tutorial to get lost in the effects. Everything I add must help you understand the subject better.
I like the intros on videos produced by Kristina Werner, Tim Holtz, Hero Arts and Lawn Fawn so I decided to make one for Katemade Design tutorials. To edit the intro clip, rename it, and then add the new video to it. If there are slow spots with action but no talking I will speed up the film. I can do close ups with editing which works well as it's hard to make those adjustments while filming on your own.

Step 6 - Secondary Review (Optional)

On occasion, if the subject is a bit too familiar I will ask someone to review my tutorial, video or otherwise,  before it is posted. I've asked an English teacher friend who is good at telling me where I am missing information for people unfamiliar with the subject.
Allison Rankin-Fillo, is another person who has checked my tutorials, her blog is one of the first I read regularly oh those many years ago. It is not her craftiness, however,  that compelled me to ask for her help but the fact that she is a technical writer.

Step 7 - Upload and Promote

If all checks out I upload the video to YouTube and post it on the blog. Then I let the world know via social media that it is available and wait for feedback or fallout.
Thanks for visiting and
Happy Crafting,

Sunday, September 30, 2012

A busy life and random cards

You know how life gets really busy for a while then seems to settle into a nice rhythm and you get routines for daily living down pat. Me neither. I seem to always be running even when there is no where to run to.

Each month at work we have a week and a half of crazy busy leading up to our publication date. I create ads for a monthly direct mail magazine. This last week was the week and tomorrow (or today depending on what time you are reading this) starts the really crazy half week. So I have been busy with work.

I am working on updating some furniture and our house looks like the prequel to Hoarders, "Hoarders - How it all begins." The dining room cabinets have been cleaned out completely and their contents are all over my living room. I will be posting on these projects later. If you want a clue as to what some of the changes will be you can look at my Pinterest board For the Home.

I have also been busy with Cub Scouts taking my son to his meeting one day and returning the next with the neighbors kids for their meetings. 

Today (or yesterday - again depends on when you are reading this) I started a new volunteer position. I am a catechist at church teaching 6th graders. This is my first year but I am teaching with a woman who has several years experience and I am looking forward to both teaching and learning in this class. The other teacher's goal is for the kids to shock their parents with what they have learned. I took the challenge. We are studying the Old Testament and today I taught the kids a mnemonic device to help them remember the books of the Pentateuch (the first 5 books of the Bible) in order.

God's               Genesis
Everlasting      Exodus
Love                Leviticus
Never               Numbers
Dies                 Deuteronomy

I do have a few random cards to show you today.

A thinking about you card,
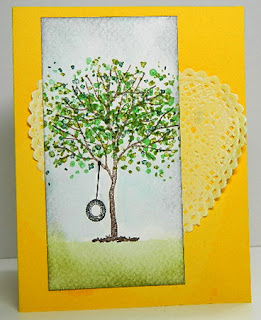
When Life Throws You a Curve Swing Card by Katemade Designs.
Stamps: SU Branch Out. Interior sentiment: "When life throws you a curve swing"
Inks: stamped and color washed with SU inks. Edges blended with Distress ink.
Doily and card front spritzed with Mister Huey.
Paper: Watercolor focal point, Dollar store heart doily and SU card stock.

a here for you card,
Here for You Card by Katemade Designs
Stamps: SU Friends 24/7. Inks: Stamped background and sentiment SU inks.
Flower stamped with Momento Ink and colored with Copic Markers
 and a congrats on the new job card.
It's a good day (to wear a tie) by Katemade Designs
Stamps: tie from SU More Monkey Accessories Sentiment from Unity Stamps.
Ink: Momento and colored with Copic Markers
 Like I said Random.
Happy Crafting,

Tuesday, September 25, 2012

Enjoy the Ride


I love making tags. They are like therapy. 
 
There is no pressure to make them archival like scrapbook pages. They don't have to tell an accurate story to my (hopefully someday) grandchildren and great -grandchildren. Tags don't have to be send-able or sell-able like cards.

I made the background on this tag when I was playing around making Tim Holtz style tags. It's blueness sat on my desk for days waiting for a purpose. I decided to stamp a few trikes on it using Distress ink. I stamped the first one and them just stamped off the ink for the other images. 

I had made the Enjoy the Ride flag a while ago for a different project and just pulled one out of the precut/prestamped drawer of my scrap storage. 

I thought it looked a little odd just sitting there so I decided to stitch it on the tag. I used embroidery floss and in retrospect I should not have used so many strands. The red was lonely so I stitched the 3 x's at the bottom of the tag. To complete the triangle I added the red ribbon.

I placed the tag on a kraft card and thought it was too plain so I added white polka dots. It's a simple card but I like it.

Happy Crafting,

Thursday, September 20, 2012

I made my own washi tape

There are several kinds of trends in paper crafting.   
  • Images -  bikes, silhouettes, owls, pennants, or hot air balloons.  
  • Shapes - chevrons and hexagons. 
  • Tools - Distress inks, stains and markers, misting inks, templates, vinyl, die cutting machines (electric and otherwise).
  • Materials - shipping tags, twine, crocheted flowers, wooden die cuts and washi tape.
Back when the trendy material was ribbon I purchased a lot of ribbon. A LOT of ribbon. But I was never great at tying pretty bows so I didn't use it much. I have boxes of ribbon that just sit on the shelf waiting for a design that requires their assistance.

The trend I am currently loving is washi tape. I don't have much but it is so easy to use, no tying required. But washi can be expensive for a cheapskate. Because I am always looking for ways to create crafts for less I have turned to other types of  tape to see if I could make my own washi.

Cutie Duck Card with washi and doily


This card was made with washi from K & Company (EK Success) for use with their Smash books. The rest of the materials on this card are from my scrap drawer. The paper is also K& Company. The sentiment is from the dollar bin at Micheal's it originally read "cutie pie" with an image of a slice of pie. The doily is from the dollar store. The ducky has been in my collection for nine years.  I purchased it for my son's first birthday party invitations, but that's a different story for a different time.


Turtle card experiment with homemade washi tape
The image on this card is from the Recollections set Zoo-licious. I was just playing with this image. I colored the spots with a white crayon and made a mask for the head, tail and legs and spritzed. Then I masked the shell as well and spritzed again. Then I scrapped off the crayon and shaded the legs, head and tail with Copics.

Close up of homemade washi tape from medical tapeThe card sat for a couple of days before I decided to add the tapes. It just looked undone, too plain. Now it looks done.

The same washi I used on the first card was laid down first. I then laid down a tape I created with cloth medical tape and stamped with the flower from the Papertrey Ink Up, Up and Away stamp set. The cloth tape takes dye and alcohol  inks well. The leaves were made but just touching a Copic marker to the tape, it automatically bleeds just enough to look like a leaf. 

.
 The next card uses the same tape with a different stamp. This time it's Lawn Fawn's Critters on the Farm set. I stamped the fence on the tape that was stuck on my craft mat. I wish I had stamped it on the card itself because when I stuck it down the fence kind of took a western slant.

The images are colored with Copic markers. The white coloring comes from a paint marker on the cow and a gel pen on the barn. The cow bell is colored with a silver pen.


Given the success of using cloth medical tape I decided to give the paper version a try. I didn't stamp on this one I kind of like the tonal difference. This card was also made with stuff from my scrap drawer. Next time I'll be stamping on the paper tape to see how that looks.

This weekend I purchased a few more rolls of washi at Archivers. They had designs that will work well on Christmas cards.

Happy Crafting,