Showing posts with label Video Tutorial. Show all posts

Wednesday, December 30, 2015

Converting Wood Mounted Stamps to Cling Stamps

How I lost over 35 lbs pounds without dieting or exercise

I didn't go on a crash diet or run a marathon. I sat at my craft table and converted wood mounted stamps into cling mounted stamps.


What you will need

  • EZ Mount Static Cling Mounting Foam
  • Hot Knife (I use the Creative Versa-Tool from Walnut Hollow)
  • Craft knife (I use an Olfa knife because it doesn't roll)
  • A heat safe surface - I use a tile trivet. Glass is also a good choice.
  • In the nice be not necessary department (NBNN) - an embossing buddy or some powder to remove the stickiness.

How to do it

  1. Peel rubber stamp off the wood block and foam.
  2. Turn on the hot knife, it should be really hot when it comes time to use it.
  3. Remove all foam and stickiness from the back side of the rubber stamp, it should be as smooth as possible.
  4. Peel the EZ Release printed liner completely off the cling side of the EZ-Mount foam.
  5. Turn the EZ-Mount over and find a good position for the stamp.
  6. Use the craft knife to cut a piece of foam to mount the stamp on. Close is good when trying to save money/materials but not critical as you will use the hot knife to get very close.
  7. Peel off the liner paper and place your stamp face up on the sticky surface.       (Quick Trick: After you peel a corner of the EZ Release printed liner up, tear a little bit of it off so you can use it to hold the adhesive EZ-Mount foam down while peeling the rest back. This saves a lot of headaches in trying to keep your hands and work surface from getting sticky.)
  8. Before using the hot knife, you can dab the sticky foam with an embossing buddy or some powder to remove the stickiness.

  9. Use the hot knife to cut the mounting foam of the edge of the stamp.
    (Quick Trick: If you place it on the heat safe surface, tilt the knife away from the stamp so that you have foam under the entire stamp.)


Quick Trick: Don't get your hair too close to a hot knife or you will hear a hiss and be assaulted by the smell of your burning hair. Trust me on this.

Come back soon to see what you can do with 35 pounds of wood.


Happy Crafting,

Tuesday, February 18, 2014

Making Patterned Paper with your Silhouette

Have you ever wanted to create your own patterned paper? Today I show you two ways to do just that.


Method 1

1. Choose an image in your silhouette collection of cut files.
2. Reduce to the size you like.
3. Click on fill page.
4. Select a background color and send it to the back.
4. Select all images and turn off cut file.
5. Print.
Note: There is no need to use crop marks with this method.

Method 2
1. Drag images (JPG, PNG, GIF or BMP files) to your patterns folder.
2. Create shape and highlight.
3. Scroll to bottom of available patterns and select your new pattern.
4. Adjust size of pattern in Advanced Options.
5. Turn on crop marks.
6. Print.
7. Run though Silhouette to cut out shape.

Come back next Tuesday for another Silhouette Video Tutorial: Fussy cutting photographs.

Happy Crafting,

Wednesday, October 10, 2012

BTS How I make video tutorials

I have dreams for this blog. I made plans to achieve those dreams. Then life smacked me across the face and said, "Not now you fool!" in a strange accent. And I went back to being a voyeur instead of a contributor to the blogosphere.
I had planned to blog at minimum 3 times a week but was shooting daily with Sunday's off. If you  look at the dates in the archive on the lower right hand side of this page you will see how well that's been working out for me. Work and motherhood and Cub Scouts and teaching Sunday School and grief (we buried my father this past weekend) are taking their toll on my brain, energy, and craft/blog time management.
I wanted to have a weekly tutorial on Tuesdays. Showing people how to use their Silhouette Studio software. I have oodles of ideas but a video tutorial takes a lot of time to produce for me. I am not comfortable with a seat of the pants lesson when a camera is rolling. I can do one on one teaching without prep but not a video.
So instead of having a tutorial for you. I decided to show you my process for putting together a video tutorial.

Step 1 - Come up with an idea for the tutorial.

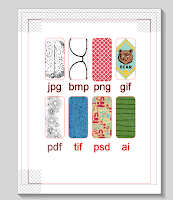
This may seem like a duh but it really is an important step. If I decide to do a tutorial that involves using the drawing tools in the Silhouette software (coming soon) the viewer will need some background knowledge like how vector graphics work. So instead of producing a drawing tools video I first need to make a video about the difference between raster and vector graphics.  I also need to figure out a good way to show the information visually and quickly. I may have to set up a few documents to make the video go more smoothly. Unless it is pertinent I don't want you to waste your time watching me make make a document with a bunch of boxes with type under them like the one I used in the tutorial Using Digi Papers with the Silhouette.
I think about a specific reader when I am putting together tutorials. For the last video it was a friend who asked specifically for clarification on the whole raster vs. vector issue. Most times it is Anne Krause, a lovely woman I met at a crop, who had a lot of questions about how to use the Silhouette she had just purchased. She took down my blog address and said she would follow me to get tutorials. Thanks for following me Anne and making me feel like I can be helpful, oh and happy belated birthday too.

Step 2 - Take one, talk it out.

Most of my tutorials are screen captures of the Silhouette Studio software. I use Camtasia for Mac and record what is on screen as I talk through it.  This first run through is incredibly rough as I am just talking off the top of my head about the subject.
After I record it I generally take a break. I may go get a glass of water or go to the bathroom or do some small task away from the computer or I may not return to it until the next day. Even a short 5-10 minute break is really important, I have dug right back in without it and I became weary with subject overload.

Step 3 - Script writing.

I play the video back and listen to how I sound and where the information seems weak. I scribble an outline of bullet points as I am listening, pausing frequently to add notes of information that I feel is missing. I am getting over the cringing when I hear my voice, I credit that mostly to Mel McCarthy who complimented me on my voice, that meant so much to me as no one had ever done that before.
Using my outline I begin typing up the script. I will play the video and type along with it trying to get it as close to the original casual conversation as possible. I pause the video frequently to add information.
If I don't script it out the next time I record I forget stuff, I ramble on and go over my target time. I'm always shooting for less than 10 minutes. Before I purchased Camtasia I was using the free screen capture program Jing and there was a five minute limit so keeping my video on point was really important. 

Step 4 - Final shoot

I always have a glass of water and a tube of Vaseline or Chap-stick on the desk so I hydrate then moisten my lips before I begin. Makes a world of difference because I need multiple takes of the first sentence, it's a killer. Once I have that down I generally can get through the whole video with only one take. 
If I am recording on the computer the script lays on the desk in front of me.
If I am working at my drafting table I tape the script to the ink holder and rubber band my iPhone to my regular camera that is on a flexible arm clamped to my bookcase.  I tried recording with my regular camera, the picture was great but the audio was horrendous.

Step 5 - Editing

Editing is so much fun. I love mixing elements, adding music and sound effects, text and other effects. I try not to get too crazy, I don't want the point of the tutorial to get lost in the effects. Everything I add must help you understand the subject better.
I like the intros on videos produced by Kristina Werner, Tim Holtz, Hero Arts and Lawn Fawn so I decided to make one for Katemade Design tutorials. To edit the intro clip, rename it, and then add the new video to it. If there are slow spots with action but no talking I will speed up the film. I can do close ups with editing which works well as it's hard to make those adjustments while filming on your own.

Step 6 - Secondary Review (Optional)

On occasion, if the subject is a bit too familiar I will ask someone to review my tutorial, video or otherwise,  before it is posted. I've asked an English teacher friend who is good at telling me where I am missing information for people unfamiliar with the subject.
Allison Rankin-Fillo, is another person who has checked my tutorials, her blog is one of the first I read regularly oh those many years ago. It is not her craftiness, however,  that compelled me to ask for her help but the fact that she is a technical writer.

Step 7 - Upload and Promote

If all checks out I upload the video to YouTube and post it on the blog. Then I let the world know via social media that it is available and wait for feedback or fallout.
Thanks for visiting and
Happy Crafting,

Wednesday, September 12, 2012

Raster Vs Vector Graphics

The Tuesday Tutorial, one day late.


RASTER GRAPHICS

Raster graphics, also known as bitmap graphics, are made from points of color called pixels.

Raster graphics are resolution dependent – this means it cannot be scaled larger without losing quality.

The standard resolution of a screen image, the images you see on the Internet, is 72 pixels per inch or ppi. Meaning there are 72 individual points of color in each inch of your image.

The standard printing resolution is 300 dots per inch or dpi. PPI and DPI are the same thing because a pixel is the electronic version of a printed dot. I will always default to dpi because I work in the print world.

If you tried to get 72 points of color to make the same image as 300 points of color you wouldn’t get too far. The image would be blurry or pixelated, which means the images is jagged because can see each individual point of color instead of a smooth line. In the print world 72 dpi is considered low resolution or low rez and 300 dpi is considered high resolution or hi rez.

VECTOR GRAPHICS

There is no resolution in vector graphics because they do not use pixels, they use the dreaded MATH. Computer software that creates vector graphics, like Adobe Illustrator or Silhouette Studio, relies on a mathematical formula to create lines. A single vector is a line, either straight or arced between two points.

Vector images can be scaled without losing quality so vector based programs like Adobe Illustrator are used to create logos. They can be scaled down for business cards and blown up for billboards.

The Silhouette studio operates at a resolution of 72 dpi. If you import something that is hi res into a low res environment or document it will come in HUGE, 417% larger than you expected to be exact, because there are so many pixels. On the other hand a low res images that is added into a high res document will be a tiny 24% of its original size because there are so few pixels.

The Silhouette Studio software uses vector graphics because just like you can’t cut a dot, the Silhouette can’t cut a pixel. If you import an image into the Silhouette Studio software for a print and cut you will need to use the trace tool to create cut lines.

So what have we learned today? 

Pixels are points of color that can be printed but not cut. High resolution images are for printing, low resolution images are for the web. Vector images use the dreaded MATH to create lines that can be printed on a printer and cut with the Silhouette. Vector images can be scaled up or down without losing quality.

Hopefully you have a better understand of the difference between raster and vector images and when and how they are used. If you have any questions post them on the blog or on YouTube. I will respond to them not only on the blog or YouTube but also in your email box if it’s included because I don’t like to have to go back and look for the answers to my questions and I doubt you do either.

Happy Crafting,

Monday, March 12, 2012

Video Tutorial - Using Digi Papers with the Silhouette


I've been playing with the Silhouette Studio software and discovered some things I just had to share. There are so many file formats you can print out from the Silhouette. Take a look.

So here it is, my first Camtasia video (I'm test driving it this month) my first video on YouTube. Hope you like it and can use at least some of the information here.

I have a few more tutorials planned but if you would like to know how to do something with the Silhouette Studio software leave me a comment and I'll try to figure it out.


Thanks for watching and special thanks to The Graphics Fairy and Mel McCarthy over at Mel Stampz for letting me use their images in the tutorial. You can find great images on their blogs and at Mel's Flickr site.


Happy Crafting,