Showing posts with label Copics. Show all posts

Friday, May 8, 2015

Makeover Week - Day 4 Hold it part 2


Tuesday I showed you 2 versions of the "Making the Grade" stamp set from My Favorite Things. Today I have more stamps from My Favorite Things where someone is holding something but like yesterday the sets are retired.

Beakers to Vases

The first card features the set, Scientist. This card was fun to put together but took a lot longer than I anticipated. This beaker holding, smock wearing little girl got a bit of a makeover.  Her beaker has been turned into a vase to hold a sweet bouquet of flowers from the retired Inkadinkado "Lots of Pots" set. Her five button lab coat looks more like a pediatric dental hygienist's smock.

Untitled


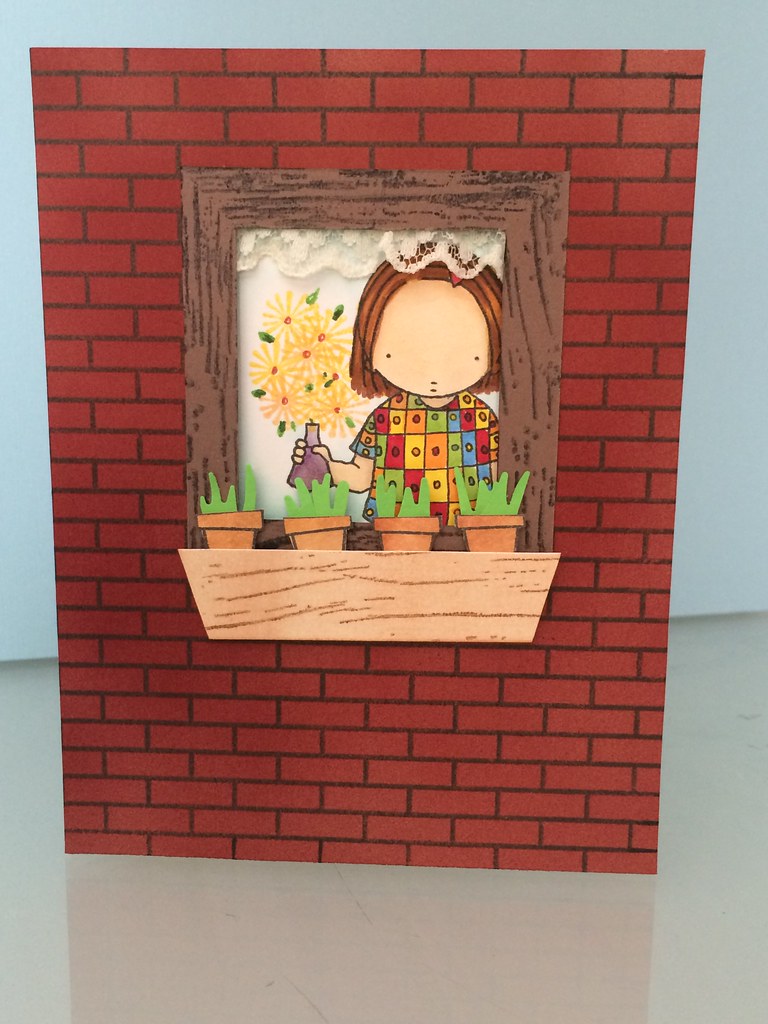
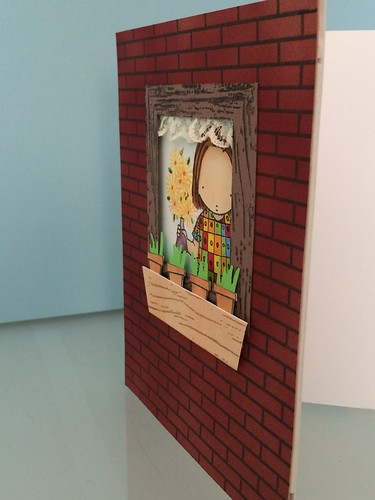
Dig all that dimension. 
I stamped the new My Favorite Things Small Brick Background Stamp onto a tan card stock, then used the Copic Airbrush to color them red.  I love this stamp, the bricks are perfectly proportioned for the rest of the My Favorite Things stamps. I cut out a window then had to make a window frame - more cutting. The wood grain on the window and the window box is from the Heidi Swapp Woodgrain background. I used washi tape to mask off the corners to give it a mitered look. I really like how that part turned out. I put the whole panel on 3M foam tape for some depth.


The valance in the window is a bit of lacy ribbon glued on the back of the brick panel. The window box is popped out with dimensional tape as well. The pots are from the Inkadinkado set I mentioned before. The plants growing in them are the waste side of the grass punch from Martha Stewart.

---------- FAILURE WAS INEVITABLE ----------

Last week when I wrote about rebooting the blog I told you I was going to fail to deliver from time to time. I had posts planned out. I had a editorial calendar in place and life still got in the way in the first week.

Sciatica, severe back pain and tingling fingers and toes, dog sitting and doctor's appointments were not all scheduled for this week when I wrote that post but they happened anyway. So Day 4 of makeover week is happening on Day 5 and you are going to miss some pretty awesome cards this week. I will post them next week. No biggie. That's the great thing about being the boss. You can change the rules midstream. Ask any parent -- it happens all the time.

--------------------------------------------------------------


You Rock Loveasaurus 

The last card features one of my favorite images by Claire Keay. The little Loveasaurus stamp used to be sold by My Favorite Stamps but they no longer carry Keay images. You can still get a digital version at the Jellypark page at PayHip.com as well as a lot of other Keay images.


The Copics got a work out on this card. This image is so fun to color and I love adding the added bits of interest like the stripes on the tail and the dots on the spine plates. The curtain and stage were freehanded but the guitar and sentiment are from the Stampendous set "Rock Out". The guitar was colored with Copics then coated in Versamark ink and embossed so the whole guitar is shiny.
I cut the arm of the Loveasaurus tucked the guitar under it. Masking to make this happen may be possible but I wasn't up for trying to do it that way.

Research on where to get Stampendous "Rock Out set turned up nothing, nil, nada. So again probably retired.

I matted the image on some kraft paper so it would pop more then decided to do a bit of decorating with my Signo Uni-ball white gel pen. I may have gone overboard but I like it. I even dotted his guitar strap so it stands out a bit more. The background is from a DCWV Matstack called Old World.

About the links

I am not part of any affiliate program - yet. I don't make any money if you follow a link and buy something - yet. So all the links here are either from the manufacturer because they are the only one selling the product or are from the site with the lowest price today. There is a 30% off sale on papercrafting supplies at JoAnn Fabrics right now so several of the links go to that site. 

Happy Crafting,

Tuesday, February 12, 2013

Fish for Valentines day

It's that time again. That time of year when love takes over and boys go. "Ewww." Because it's Valentine's Day. My son is not into love and flowers and hearts and pink, but he does want to participate. Pinterest can be a great place to go for inspiration if your kid is not into pink flowers and hearts.


There was a picture in Family Fun magazine, and a pin on 
Pinterest  that both that both mentioned school and gave fish as a treat. One was Swedish fish and the other was goldfish crackers, which I thought was a much better treat. The kids get so much candy and he doesn't need any more sweetness.  So taking my inspiration from the goldfish crackers sample, the original coming from Mel at Bliss Bloom blog, I set out to make my own. one of the rules in our school district is that all the treats must be factory packaged so I couldn't follow Mel's directions completely. 


When I get a new set of acrylic stamps especially, I scan them into the computer and go to the Silhouette and make my stamp shape fussy cutting file.  The Stampendous Sushi Bowl Party set was perfect as a background for E's Valentines this year.  I used the bowl and the little bitty fish swimming in a school, as the base of the card.
 I use the shapes from the set, but not the stamped images themselves. E chose fish from the Recollections set called fun fish, for the focal point of each card. I'm quite protective of my Copic markers and wouldn't let him use them to color the fish. Well I would've but he decided to go to bed instead which was a better plan for him.


Once I got started I couldn't stop. I colored all of them, every single fish is colored either with Copic markers or Stampin' Up ink as watercolors. Some of the fish were stamped with Stampin' Up black which is great for watercolors. The rest were stamped with Momento tuxedo black, which hates water but loves a Copic marker. 

Sample 1 of the card that will go on a
package of Flavor Blasted Goldfish crackers.

Assembly will begin this evening and I will be sure to take pictures so that we can share them with all of you. 

First Reconciliation


Before we get to dinner, before we get to homework, before we get to assembly,  E has to go for his first face-to-face confession. First communions are a big deal, every sacrament should be a big deal, but having a appointment for 4:00-something on a Tuesday afternoon just doesn't seem all that special.  Maybe on the ride to the church, maybe after it's done, something will happen and it will feel a bit more special.

In Other News 


E has finally mastered the art of blowing bubbles with bubblegum. He has worked on this for a very long time and we are proud to announce that a bubble can be blown with the proper gum.


Happy Crafting,

Thursday, September 20, 2012

I made my own washi tape

There are several kinds of trends in paper crafting.   
  • Images -  bikes, silhouettes, owls, pennants, or hot air balloons.  
  • Shapes - chevrons and hexagons. 
  • Tools - Distress inks, stains and markers, misting inks, templates, vinyl, die cutting machines (electric and otherwise).
  • Materials - shipping tags, twine, crocheted flowers, wooden die cuts and washi tape.
Back when the trendy material was ribbon I purchased a lot of ribbon. A LOT of ribbon. But I was never great at tying pretty bows so I didn't use it much. I have boxes of ribbon that just sit on the shelf waiting for a design that requires their assistance.

The trend I am currently loving is washi tape. I don't have much but it is so easy to use, no tying required. But washi can be expensive for a cheapskate. Because I am always looking for ways to create crafts for less I have turned to other types of  tape to see if I could make my own washi.

Cutie Duck Card with washi and doily


This card was made with washi from K & Company (EK Success) for use with their Smash books. The rest of the materials on this card are from my scrap drawer. The paper is also K& Company. The sentiment is from the dollar bin at Micheal's it originally read "cutie pie" with an image of a slice of pie. The doily is from the dollar store. The ducky has been in my collection for nine years.  I purchased it for my son's first birthday party invitations, but that's a different story for a different time.


Turtle card experiment with homemade washi tape
The image on this card is from the Recollections set Zoo-licious. I was just playing with this image. I colored the spots with a white crayon and made a mask for the head, tail and legs and spritzed. Then I masked the shell as well and spritzed again. Then I scrapped off the crayon and shaded the legs, head and tail with Copics.

Close up of homemade washi tape from medical tapeThe card sat for a couple of days before I decided to add the tapes. It just looked undone, too plain. Now it looks done.

The same washi I used on the first card was laid down first. I then laid down a tape I created with cloth medical tape and stamped with the flower from the Papertrey Ink Up, Up and Away stamp set. The cloth tape takes dye and alcohol  inks well. The leaves were made but just touching a Copic marker to the tape, it automatically bleeds just enough to look like a leaf. 

.
 The next card uses the same tape with a different stamp. This time it's Lawn Fawn's Critters on the Farm set. I stamped the fence on the tape that was stuck on my craft mat. I wish I had stamped it on the card itself because when I stuck it down the fence kind of took a western slant.

The images are colored with Copic markers. The white coloring comes from a paint marker on the cow and a gel pen on the barn. The cow bell is colored with a silver pen.


Given the success of using cloth medical tape I decided to give the paper version a try. I didn't stamp on this one I kind of like the tonal difference. This card was also made with stuff from my scrap drawer. Next time I'll be stamping on the paper tape to see how that looks.

This weekend I purchased a few more rolls of washi at Archivers. They had designs that will work well on Christmas cards.

Happy Crafting,

Friday, May 18, 2012

Seed Packet Party Favor Tutorial or How to Make a Potted Elephant

Preface: Apologies for the blurry photos. My camera died and I am not the best iPhone photographer yet. 
In March I was asked to make party favors for a baby shower. I didn't know the mother to be so I took a look at her registry for color clues, searched the internet for inspiration and talked to the requester for guidance. What I came up with celebrated the mother's love of animals (invitations featured a giraffe), the St. Patrick's Day shower date, and the sweet pea soon to be born.

Seed Packet Party Favor Tutorial


Consumables:
  • 2 sided 12"x12" Cardstock (paper may work but card stock is sturdier and will work better)
  • 6" Wooden Craft Stick
  • Crafty Power Tape (or Sticky Strip or good glue)
  • Packet of Sweet Pea Seeds
  • 4" Terracotta Pot
  • Ribbon
  • Stamps or stickers for decoration
  • Gold wrapped candies

Tools:
  • Paper Cutter
  • Martha Stewart scoring board (nice but not necessary) 
  • Metal straight-edge and X-acto  (or paper snips)
  • Circle punch (1" to 1.25" works best)
  • Tim Holtz Idea-Ology Tiny Attacher
     (if you don't have this handy tool you can use hot glue. I have not tested hot glue but it should work fine.) 


Step 1: Trim 12x12 paper to 11.25" x 5.5" 

Step 2:  Place the paper with the pattern you want showing on the outside of your project DOWN. Score with a heavy hand at 3 5/8", 7 1/4" and 10 3/4". Lightly score or draw a light line at 5 3/8" I chose to score so I could see the line from both sides of the paper. This is important in the next step. 


Score one more line 1/2" from the bottom.

Click on the template caption below to download the pdf.  Note: the template was created to actual size, if printing on 8.5" x 11" paper you will need to follow the measurements, not the lines.


Click here to download.


Step 3: Cut and Punch
Cut along the bottom score line until you get to the third panel. Cut from the bottom of the third panel up to the score line. Cutting at an angle makes the final product look nicer. Remove the section below the score line on the small fourth panel as well, again cutting at an angle improves the look of your final project. Also remove the top of the small fourth panel by cutting at an angle.


Fold the at the 7 1/4" score line so the second and third panels are together.


With the second and third panels folded together, line up the center of your circle punch with the lightly scored line in the middle of the second panel. Punch through both sheets of paper at the same time.


Step 4: Stick it
Open the folded pieces and place the 6" wooden craft stick on the lightly scored line and staple with your Tim Holtz Tiny Attacher, making sure the pointed edge of the staples are facing IN.
 

I put the Tiny Attacher in the notch I had just make and went as far down as I could and stapled, then I stapled again at the bottom. Those little staples go through your craft stick and the cardstock surprisingly well.  If they prongs of the staple are sticking up at all pound them down with a craft hammer.

If you are going the hot glue route put the glue on so the stick is only on about 2/3 of the paper. You want a few inches of the stick to come off the bottom of the cardstock.


Step 5: Adhere
Turn your cardstock over so the stick is facing down. Fold up the bottom flap and the fourth panel or right flap. Put your Crafty Power Tape (or Sticky Strip or good glue) on the these two pieces. Fold the third panel over and adhere to the second panel. 

The third panel is narrower than the second so there will be a small bit on the left. This helps when you fold the first panel over the seed packet.

Step 6: Decorate
The next step is decorating the card. I used the Silhouette to print and cut an embellishment that said "Thanks for joining us" for the cover. The ribbon was added next. I used the Crafty Power Tape to adhere the ribbon to the back. Then I added the little elephant, which is an image from Hot Off the Press. I cut the shape out with the Silhouette using the technique described in the Lazy Snipper tutorial I wrote last January. I colored him using Copics in colors that matched colors in the baby registry.


I printed out the sentiment "Please plant these seeds and watch them bloom. Just like the baby that will be here soon!" for the center. I'm not sure which website I found this on but I made sure I bought sweet pea seeds because they seemed most appropriate for a baby.

Put your seed packet in the pocket. Tie up your ribbon and place them in the the pot. Fill your pot with candies which will help your packet stand up.

Happy Crafting,

Sunday, February 5, 2012

Cupcake Liners instead of Rosettes

I love the look of a well made rosette but I have trouble getting them into envelopes and scrapbook sheet protectors. I also have trouble with them staying together. I must be doing something terribly wrong because I know NO ONE else has this problem. I have been using cupcake liners instead of making rosettes for a while, they are quick, easy, thin, and stay together better. Unfortunately they only come in a couple of sizes, or do they.
Recently I was in Micheal's wandering in the $1 aisle and I saw the cutest cupcake liners by Studio 18. They had a bit of a nautical feel on the sides, even though there were and I thought I could use them on cards or scrapbook pages and if I lost interest in crafting with them I could always make cupcakes in them. 

I wanted them to lay flat and these liners were having none of that so I cut them. That sounds so cruel, if something doesn't cooperate with me I go to "I cut you man" but I digress. I folded them in half and then in half again and cut the center circle out. Then slit the side so it would lay down making a semi circle then I did the same with another liner. I glued the two together to make a circle. There is an overlap on both ends of about 6-10 pleats, depending on the size of circle you want.

When I made the circle it reminded me of a circus tent and I just happened to have a Circus stamp set from TPC Studio in stash. It also reminded me of the onesie my son was wearing when he first stood on his own. I had to find those pictures. Dig. Dig. Dig. Eureka!
The elephant's frame is overlapped by 6 pleats on each side.
I colored all the circus image before I found the picture, what great luck that the "extras" in the picture were yellow. I cut all the circles on the page with Spellbinder's Circle die. The journal circle was cut out of a divider that comes with Recollections photo boxes from Micheal's. I used a thin marker to draw the outline which gives it a much more finished look. I glued the images to the liners then glued the images to my page making sure that only the center of the liner/image piece was glued.


After I finished the page I poked around the interweb a while and looked for other ways to use cupcake liners. I pinned them all to a Pinterest board. Yes I've finally climbed aboard the Pinterest bandwagon. I resisted for a long time because I already had a Visualize.Us account and didn't see the need but I couldn't resist any longer and signed up last week.  If you'd like to see the other ways to use cupcake liners check out my Cupcake Liners Board.


Working on a couple of tutorials so keep an eye out for those. Better yet become a follower so you don't miss them.

Happy Crafting,

Monday, November 28, 2011

Different Drummer Christmas Card


Each year I make traditional Christmas cards: Tree and Ornament cards, Santa and Sleigh cards, Rudolph the Red Nosed Reindeer cards, Holy Family cards, Wise Men cards, Baby Jesus cards.

The card to the left is one of those traditional cards. Embossed notes on red paper with a bracket tag on top  stamped with an image of a little drummer boy and colored with Copics. "The Little Drummer Boy" was a favorite Rankin/Bass Christmas Special from my childhood so when I saw this stamp a few years ago I had to get it.

I've been getting a lot of use out of my old Xyron lately adhering full card fronts on card bases made with Papertrey Ink Basic White.


I made a set of 3 cards using the Little Drummer Boy idea in a new way. When I was working on the Rock Star Rosie Benefit I downloaded a drum set from the Silhouette Online Store thinking I would use it to make thank you cards for people drumming up support. I never made those cards so I used the shape to make untraditional Christmas cards. Wishing a Rockin' Christmas to a Little Drummer Boy. The guitar was created from an outline of a guitar in the Rock Out set by Stampendous using the method described in my Lazy Snipper tutorial.  I forgot to tell the machine NOT to cut the text in those guitar and wasted a piece of cardstock and more time than I was interested in losing. Is there an oops or undo button on the Silhouette SD?

The card fronts on these cards are from the DCVW Rockstar mat stack. Black and metallic magenta are not  traditional Christmas colors but I know a few people would probably be happier with these cards than the first card.

So what do you think? Do you know a drummer who would appreciate these cards?
drum_set_C20091009222859_2581


Happy Crafting,

Friday, October 7, 2011

"Painting" with Copics

The Rock Star Rosie Benefit was a great success and Katemade Designs was one of the most successful vendors. There were about 500 in attendance between visitors and volunteers.

I have been trying to update the website but my computer is not liking Dreamweaver or Flash for the last few days, crashing before pages can even be opened let alone changed. I couldn't sleep last night and tried again when I got up at 3:30. When the programs refused to open again I turned to creating without pixels. 

I pulled out a canvas board and a paint pen and started drawing. I only have a few paint pens, a think black, a white and 2 shades of green, but I wanted to use other colors for the leaves and didn't want to clean the desk and dig out the regular paints so I tried ink as a watercolor wash. It barely colored the board. You can see the pale purple in the bottom center. I then turned to Copics to paint the leaves and WOW. 
 
Copics reacted with the paint from the pen and allowed for some really nice shading. When coloring on cardstock it's best to make small circles, which is how I would use crayons, to maintain a wet line and consistent color. Last night I used the brush tip more like a brush on the canvas board than I do when I am coloring on cardstock. I really liked the process and am pretty happy with the results too. My son asked if he could HAVE the art work for his room.

So what do you think? 
Have you ever used Copics on canvas?  Have you ever used Copics markers like they were paintbrushes?

 
The particulars
Paper: Canvas board
Colorant: Paint pens and Copics

Happy Crafting,

Sunday, September 18, 2011

Christmas Card Production has started

I feel so ahead of the Christmas card curve this year.

I generally start my Christmas card production in November. Almost too late if you are sending a lot of them - I don't so it's about right for me. But this year I have started already.

Each year I allow myself one new Christmas stamp or set. I have a lot and need to reign in the spending but one new one doesn't feel like too much of a splurge.

Last week I pulled out this  sweet partridge tree stamp, last year's one stamp, from Stampendous inked it up and just played with my Copics. I LOVE the results. So I will be making several of these cards. I'm learning a lot about how to get the most out of my Copics, following directions in the Copic Coloring Guide by Colleen Schaan and Marianne Walker.

My son and I were in Micheal's last week and they had an end cap of Christmas stamps. There were several designs I would have loved to make cards with but the budget, limits of space and common sense said "stick with only one" so I called in the expert. I chose 3 I liked the most and asked my son to choose his favorite from that small selection. He chose the stamps that looked like children in a Christmas play. A wise choice. I have stamped that angel's face on numerous bits of scrap to make tiny gift tags. Those tags will be extras for those who buy cards from me at the Rock Star Rosie Benefit in two (2) weeks. I can't believe it's only two weeks away.

To learn more about Rosie go to Research4Rosie.com. If you would like to help spread the word about the benefit please send your friends to Rosie's site or post the flyer in your church or place of work.The flyer is available on Rosie's web site.