Monday, January 31, 2011

What will the Silhouette cut next?

I like to push my tools to the limits to see what they can do.

I put things through my Cuttlebug that the creator never anticipated: leaves, yarn, Fiskars texture plates, plastic canvas, basically anything with a texture. Well the Silhouette is no different. I cut a few things out of paper and then thought, "Let's test this bad boy and see what it can do."

I saw a great layout by Julie Fei-Fan Balzer and wanted a stencil of large dots too. Because I was in a hurry I just looked at her pictures and skimmed the text. I didn't notice that the stencil she was using was  a *new* soon-to-be-released-at-CHA stencil from The Crafter's Workshop!

I tried to make one with my Silhouette and succeeded! But this is a cautionary tale.

I made a 3/4" circle, easy enough and then used the replicate tool's Column of Four a couple of times, then spaced things out a bit. Then with the entire column selected I used Row of Three a couple of times, and spaced the columns out.

I used the Plaid Simply Stencil material and it didn't cut through. I got out another sheet and tried it again but this time I clicked on double cut and VIOLA! I have a large circle stencil. Of course it's not 12 x 12 but it'll do.

Now on to the cautionary tale bit. The blade still cuts, but I don't think it cuts as well. It looks like it's tearing card stock instead of cutting it. I needed a pair of scissors and decided the best kind material for a pair of barber shears was tin foil. I was also hoping that the foil might sharpen the blade. I used my Xyron to put an even layer of adhesive on a piece of black card stock then adhered it to a piece of tin foil. The paper under the foil on the scissors isn't really cut through. I had to really work to get the circles out of the handle. I should have double cut this one as well.

Didn't work really so I guess I need to buy a new blade.


So if you really want to make a stencil, you can with the Silhouette. You can make a stencil of anything you can dream up. But be forewarned that you will be dulling the blade quite a bit.


For those who would like to see the full page here you go.

I like this page for several reasons.
1. It's finally done.
2. I got to use the Silhouette.
3. I got to use PINK on a boy's page. It's the hairdressers tape that I used on his bangs when I gave him that first cut. It's able to be repositioned and it's easy to write on.
4. It contains my son's actual hair.

So now on to the question of the day. Should I add the boy's age on the page or is the date enough?

Happy Crafting,

Tuesday, January 25, 2011

Missed it by that much

I wanted to get in on the Papertrey Ink blog hop today but it didn't happen what with one thing and another. I rushed and put together a card in about 10 minutes. Unfortunately I didn't get it done in time for the contest. The collection over at Nicole Heady's blog was closed at 11 EST, not CST. Time zones are so important. I was so disappointed. But I can share it with you so I will.

The challenge was:
This month's blog hop challenge involves you challenging yourself to use a Papertrey stamp set that has yet to see ink or even one that might be collecting a little dust!  Go through your stash and see what little used treasure it might hold.
My stash of PTI stamps is limited and I haven't been stamping lately so I  could use anything. I like using images in a different way than their original designer had in mind. This lamp was an umbrella and a hot air balloon. The wall paper is the small flower in the Up, Up and Away. A bit of doily and a small piece of K & Company wood grain patterned paper make this look a bit like a scene from grandma's house.

Note to self, next time don't rush the camera work either.


Happy Crafting,

Friday, January 21, 2011

Missed a Go. See. Now. Giveaway

There are 40 winners in this one so you have a better than average chance of winning a new, unreleased Core'dinations assorted pack of cardstock. There are 2 versions Tim Holtz and Ranger Distress collection and Tim Holtz and Ranger Adirondack collection. Click on the link below and Go. Enter. Now.


http://pages.email.darice.com/core2/p?eKey=BlucElbcbcRFt4RdRmSt0gml0X4cu

Happy Crafting,

Go. See. Now. Giveaways.

Just a small sampling of the giveaways this week. These are still open so Go. See. Now.

NoBiggie has a scrapbookers giveaway going with a lot of pretties for your pages. Go. See. Now.

Cards and Scrapbooking Today is giving away a $25 gift certificate to Your Next Stamp. Love the Irish dancers. Go. See. Now.

Jennifer McGuire is giving away 2 Hero Arts DVDs. The previews are wonderful and it looks like there's a lot of inspiration there.  Go. See. Now.

Chris Guillebeau over at the Art of Non-Conformity site is giving away FREE TRIP TO ANYWHERE. Can you believe it? He'll get you anywhere you want to go, once you're there you're on your own. I can't enter because right now I can't afford room and board but maybe you can. This ends today so Go. See. Now.

Happy Crafting,

Thursday, January 20, 2011

New items in the Etsy shop

There are new-to-you items in the Katemade Designs Etsy shop. I'm trying to reduce the number of stamp sets I don't use and raise a bit of money too. Unemployment goes just so far and when you have bills for car troubles, plumbing problems and medical visits all coming due at once.  Yes it's been a bad month and extra funds would be good.

Each purchase from the Katemade Designs shop gets a little something extra, whether it's gift tags or a card or embellishments -- it's like a fortune cookie, or a box of cracker jacks, or a box of chocolates - you never know what you'll get.

Soon there will even be handmade items in the shop but I need to clear the decks first.  Click on the For Sale tab above to see some of the new stuff or click here to go directly to the shop.

Enough of the sales pitch I need to get back to work.

Happy Crafting,

Wednesday, January 19, 2011

WOYWW Eye Spy game a little late

I went to bed at the same time my son did last night. A good move, even if it was unintentional. But this morning when I finally got to the computer there were already 109 links on Julia Dunnit's Stamping Ground blog  - the home of What's On Your Workdesk Wednesday (WOYWW). So much for breaking the top 100.

This week I have a newsletter to write/produce a cub scout meeting to prepare for (need to get those patches on the shirt and vest) as well as all the normal stuff so I haven't spent oodles of time creating stuff that is blog-worthy. Well I've made a mess and that's what WOYWW is all about right? Actually embracing the mess seems to be a theme lately the Decor Chick! blog had a Real Homes, Real Messes, Real Life…Link Party! on Monday. It really made me feel normal.


Like I said I don't have any new projects to share but I have remnants of past projects still lingering on my desk.
  1. There is a worm from the Silhouette tutorial I posted on Friday, you can see it here.
  2. The card from yesterday's post, you can see it better here.
  3. There is great wood print paper from K & Company.
  4. There is a card that I'm working on with a 60/70's feel - remember the men's jackets with the 2 stripes down the right side. Haven't figured out a main image or sentiment but the background is on the desk.
  5. There is a box of wire working supplies. I needed a bit of black wire to adhere a giraffe to a title piece for the scrapbook I work on at the local retirement community. I volunteer a couple of hours on Tuesday mornings and work with residents to make a scrapbook. We have completed one book and will be either adding pages or getting a new one for moving on to a new book next week.
  6. There is a stack of paper my sister gifted me this Christmas, I used one for the aforementioned title that is below.
  7. There is also a stack of stamps destined for the Etsy shop.
  8. And lastly my son's pinewood derby car that we have yet to begin work on.
Bonus bit -  below the desk you can kind of see the rolling cart I made for card stock storage.

The title for a page I worked on at the retirement home. Love the giraffe paperclip.

Happy Crafting,

Tuesday, January 18, 2011

There's one in every crowd

Over this past weekend followers to this blog have more than doubled and traffic is better than it has ever been. I am so incredibly grateful and a bit humbled too.

So, welcome every body to my little corner of the web. I hope I will be able to entertain, inspire and inform you. I am planning a new silhouette tutorial for next week but in the mean time here is a card I put together using the Studio Calico camera stamp I won. All shapes were cut out with the Silhouette and the sentiments are from my own slightly twisted mind.

The camera shapes were cut out and then I stamped the images with 3 different styles of ink, Stampin' Up! classic dye ink, Distress ink and fluid chalk ink. It was an experiment that looked so cool next to each other that I thought I needed to make a card with them all. The image has such a 70's vibe and I thought wood paneling was a perfect match. When I was trying to figure out a sentiment I thought about what it was like to have a bunch of cameras in my face in the 70s and came up with this:

The particulars
Paper: K & Company Actopus to Zelephant patterned paper, white  Ink: Green is Distress Ink, Tangerine Tango from Stampin' Up!, Color Box Fluid Chalk ink in Charcoal
Stamps: Studio Calico camera, Hampton Art Studio G alphabets (from the Micheal's dollar bin)

Happy Crafting,

Friday, January 14, 2011

The Lazy Snipper OR Feeling Like a Genius - a Silhouette tutorial

*Edited to add dpi settings to Step 7 of tutorial.

I have a pair of scissors for fabric, a pair for rubber, a pair of snips for paper and pair for ribbon. I have rotary blade cutters, guillotine cutters, X-acto knives and a great Olfa snap-off blade cutter that I use all the time. I have a carousel of neglected decorative scissors. You'd think I was a cutting expert from looking at this collection but you'd be wrong.

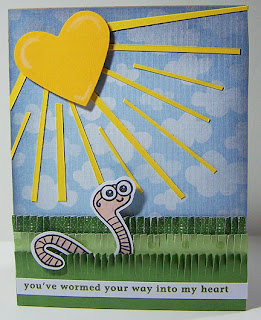
Because I am a bit of a perfectionist I am never quite happy with my cutting ability. I feel clumsy when  cutting outside the line of a stamped image. I leave too much paper or cut into the image. It's not clean and uniform. And if I need to cut in a tight area like the back of the worm here or inside an image like yesterday's airplane forget about neatness. But I don't feel so clumsy today. Today I feel like a genius.

Isn't that a brilliant cutting job on the wormy? It's perfect. I didn't increase my scissor skills or knife prowess overnight. No. I let the Silhouette do it.

I figured out how use my Silhouette Studio (V1.3.0) to create the perfect shape for this stamp and it would work for any stamp. I use Photoshop (CS4) and but I'm sure you could do the same thing with any edit imaging software that you can scan images into (you may even be able to make it work with hand coloring). This tutorial uses operations in the programs I have, you may need to adjust for your own programs.

How it was done.
  1. Stamp the image on white paper and scan into the computer. The darker/cleaner the stamped image the better.
    (Using a stamp image from a scan will violate stamp companies angel policies but following this tutorial will not leave the image on your computer and I would never advocate breaking an angel policy.)
  2. Open the image in Photoshop
  3. Select the area outside the image with the magic wand tool 
  4. Go to Select and scroll to Inverse so that only the stamped image is selected.
  5. Make sure your background color is black then hit Delete, this will turn your image a solid black. Clean up any areas that look dodgy with the pencil tool and/or erasure tool.
  6. With the image selected go to Image and scroll to Crop.
  7. Go to File and scroll to Save As and filename.jpg  Close file.
    (choose your own filename. I use the stamp company's name followed by the stamp set name and a description of the image) !! Save at 72 dpi or your image will not match your stamp!!
  8. Open Silhouette Studio and open filename.jpg.
    You can either go to File then Open and browse through files until you find filename.jpg
    OR you can drag the file from its folder directly onto the Silhouette work area.
  9. Open the Trace Window.

  10. Click on Select Trace Area.
  11. With the Select tool selected draw a box around the image.
  12. Your Trace Settings should be set so that your image is filled with yellow.
               High Pass - turn off,   Low Pass .25,
               Threshold 75%-ish,    Scale 10-ish
  13. Click Trace
  14. Click on the solid image and Delete it. You will be left with the outline of the image.
  15. Go to File and scroll to Save to Library.
  16. Go to Offset Select Shape and change the offset to approximately .045" to put a little bit of paper around your image. Of course you can adjust the Offset to your own tastes. I tried to stamp on a piece that was cut to the exact size and it was nearly impossible, I couldn't see through the acrylic block and stamp well enough to make it work. 
  17. Click on the original shape and (re)move it from the offset shape. If you don't when you cut you will get two shapes, the original and one that looks an awful lot like a silly band.
As much as I like this method I will keep my metal dies, thank you very much. I love running dies through my Cuttlebug and it's a lot quicker than going through all these steps. I will also continue to cut things out with my snips and my Olfa but this is a great way to get a clean cut on stamp shapes that require delicate interior cutting like the airplane I shared yesterday.

If you have any questions just let me know.

Card particulars:
Stamp: Imaginesce Snag 'Em Stamps Worm (no longer available)
Sentiment printed to mimic Old Olive (42/31/88/6)
Paper: Patterned paper from K&Company Actopus to Zelephant Designer Mat Pad, All other paper from Stampin' Up! in Old Olive, Certainly Celery, Whisper White, Summer Sun, & Crushed Curry.
Grass made with Multi-Blade scissors.
Heart punch from Stampin' Up!


Happy Crafting,

Wednesday, January 12, 2011

WOYWW I'm back

I can't believe I am still up at this hour (2 AM) but I was writing up a tutorial on how to use the Silhouette to cut your stamped images. I need to proofread the steps before I post. If anyone knows how to record your actions on the screen let me know as I'd rather do this as a video.

I made the card below as part of the "testing the theory" portion of my work on that coming post. Isn't the cut line on that plane beautiful.
The particulars: Paper: Stampin' Up! Bashful Blue, Whisper White, DCWV The Glittered Winter Mat Stack Ink: Stampin' Up! Real Red, Night of Navy Stamps: Papertrey Ink Fly Away Dies: PTI Clouds

If you have a Silhouette machine you may want to click "follow" so you will not have to go hunting for this coming tutorial later this week.

Maybe I'll break the top 100 on WOYWW this week.


Happy Crafting,

Monday, January 10, 2011

Thank You Studio Calico

Back on December 21st I posted my Studio Calico Christmas Wish List and kind of forgot about it with all the hustle and bustle of the holidays. Friday I came home from lunch with my mother and there was a box sitting on my door step. A box 14.25" x 13" x 4.5" with the Studio Calico logo on the side. I had won my Christmas Wish List.

When I opened it there was a lot of paper that I removed to reveal a plastic bag with inks and paints that were on my list. YEE HEE!

There was also a paper bag that had a sticker sealing it shut with a note on it:
 Darn what did I want that I wasn't going to be getting?

I was so excited to see what they used to replace the items that were no longer in stock. I am now set with all kinds of goodies. The note cards I asked for were there in abundance. Wood Veneer Alpha Stickers were on the list and in the box but there were also Wood Veneer star stickers and Frames. YEE HEE! I know exactly what to do with these. Now all I has to do is find the photo of the boy with the drill.  There were all kinds of stamps because the Weekday Stamp Set was sold out. I now have photo labels, number stamps, a new thank you stamp, a camera and a photo frame stamp. It'll be a few weeks before we I can play with these but I'm looking forward to it.

 Thanks again Studio Calico.

Happy Crafting,

Saturday, January 8, 2011

Dreams with Deadlines

I don't do make resolutions. They are easily broken and says failure to me. I make goals, if you have difficulty reaching a goal it is considered a minor setback, a stumbling block, not a failure.
I've divided my goals into 3 categories: personal, craft, and professional. I am also trying to keep in mind that I need a deadline on these because:


“A goal is a dream with a deadline.”

— Napoleon Hill             

Personal: 
  • Spend time each day reading my Bible. I spend the last moments of each day reading a bit in the Bible hoping God's Word will be the focus of my dreams and coasting thoughts (coasting is that period between fully awake and fully asleep). It's not study and I don't think isn't adequate but it's a start.
  • Live as simply and clutter free as possible. I am continuing to sell, donate or dump stuff I don't use. My house has too many stamp sets, craft supplies and vintage crochet and knitting patterns I don't have space for. I HATE throwing anything remotely useful away so I am selling crafty stuff on Etsy. I plan on posting a lot more sets and patterns to my shop this week but this time I am putting a time limit on their sale.  If they are not sold by the end of February they will be trashed or donated. If you know of a charity that could use these items I would love to hear about it. 
  • Keep the whole house (fairly) clean. I am doing a pretty good job of tackling an area a day on the clean goal and tomorrow will be an all out attack on clutter and dirt. Then my goal is to put together a cleaning schedule making the job more daily maintenance than cleaning time suck. Of course as Erma Bombeck said, Cleaning the house while the children are growing is like shoveling snow while it's still snowing.

  • Take the risk and meet new people. My house is becoming like a hermitage and that is never good. So I need to get out of the here more often and introduce myself to at least 2 people a week.
Craft:
  • Finish the umpteen projects that I have started. I've identified the unfinished projects that haunt me most: the scrapbook pages that have no journaling or just Post-it notes with ideas scrawled on them and the card sets that are a card or two from completion. I would like to get these done by the end of January. The motto for craft this year, "Just get on with it." Remember the word for the year is COMPLETE.
  • Don't start a new project if I have 3 or more unfinished projects waiting to be worked on. Some projects require drying or curing time and it would be silly to stop creating, especially if the mood hits, while waiting on something else. But I do need to journal when I'm working on a page not days, weeks, months or years later.
  • Submit projects to publication and designs to manufacturers. I am working on the research into which publications & manufacturers are the best fit for my work.
  • Increase followers on this blog. This blog is networked on Facebook and I can't see an of the analytics until I reach 20 followers so I would like to have 20 blog followers via FB by June. I guess if a goal is something you can do yourself then this one is really more of a wish. I will try and share more projects and useful information to make following worthwhile. Tomorrow I plan on beginning a series called Silhouette Sunday where you can get my designs and a few tips I have figured out. I need a few bits of information before I can post but if not this weekend then next weekend for sure.

Professional:
  • Become proficient in more Adobe programs. I start classes on Web Design and Animation in February and am quite excited to be a student again. I love learning stuff.
  •  Become employed (preferably in a job that I can also do from home if my kid gets sick). I'd love a job the feeds the soul and crafty spirit but I need one that feeds the belly and provides shelter from the elements.

Happy Crafting,

Thursday, January 6, 2011

Grey or Gray

Papercraft Arts Magazine's Moxie Fab World blog is hosting a challenge, The Gray is the New Black Challenge. Which gets me busy and gets me thinking. I got busy and created this quick card  for the challenge. I'm not sure how I feel about it. I flip flop between "nice" and "what were you thinking" so I ask you, is this a decent attempt or is it time to deep 6 this card.


What got me thinking was the spelling of Gray. I prefer spelling it with an "e". I see the two spellings as being for different tones of gray.
GrAy contains tones of blue. It's a cool color, like fog. It's light and slightly effervescent.
GrEy is a warm color with tinges of yellow or red. It is the color of shadows on faces in the glow of candle light.
The project particulars
Paper: Stampin' Up Blush Blossom
Stamps: SU Fifth Ave Floral, Hello (Micheal's $1 bin) Inks: SU Going Grey, Basic Grey, Pink Pirouette, Blush Blossom
Embellishments: Adhesive pearls

Happy Crafting,

Tuesday, January 4, 2011

What is scrapable?

What constitutes scrapability for you?

Is it the amount of photos you have? 

Do certain holidays, like Christmas and Halloween, or occasions, like birthdays and the first day of school, demand to be scrapped?

Are you an emotional scrapper, recording your feelings about things
and only scrapping when those feelings are strong enough?


I will scrap pretty much anything if the mood strikes me right. I don't even need photos. Actually too many photos can be paralyzing. I will freeze and not get anything done on my personal work if I have too many choices. For example, I have 125 photos of one parade at Disney in 2009 and I haven't scrapped it yet. There are just too many images to choose from. 

Ask me to edit other people's photos and I have no problems. I can look at them and identify which images will tell the story best and which to cut. But when they are in my collection and they are pictures my 6 y.o. took I am not so quick to cut because they mean a bit more to me.

I'm not good about scrapping holidays either, especially Christmas and the events leading up to it, because I am busy doing, creating, wrapping, cooking & baking and experiencing things to photograph them. I never think to stop flouring the counter top to photograph us baking cookies. I don't have enough hands to put the lights on the tree and take pictures of the process at the same time. 

Maybe it's because I didn't grow up with a camera in my face. Film and developing were expensive so photos were carefully considered. There are a few pictures of my childhood, generally posed or well staged images. Because they are rather rare they mean a lot to me, but my strongest memories have nothing to do with those pictures. There are no photos of my most intense memories, which all involve my sister and food: the cereal box hockey rink with the milk ring puck, the popcorn toss across the Indian blanket so the dog wouldn't get any, pizza muffins and jello.

So this year I am planning to take more pictures so that there is a better record of my son's childhood than mine. I also want to scrap those photos and my own childhood memories, even if I don't have photos. My plan is to do at least one page or spread a week, minimum. It remains to be seen how much gets done but at least I have a plan. I will try to post most of the pages so stay tuned.

I did scrap one thing from the holidays this year. We went to see Tangled in 3D on New Year's Eve and I scrapped it. We don't go to movies much so it's a scrapable event. 

I started out playing with my new Silhouette. A gift from a couple of friends who needed someone to watch their kids for winter break. Trying out the weld and offset functions and $23 was on my mind so I tried making that. Of course, as with so many of my projects, one thing leads to the next. I was going to need a focal point so I went to the Tangled website and found wallpaper featuring the female lead.

I didn't really plan on scrapping this movie - it just sort of happened. The design got rave reviews from my son. "Do you like it ?" I asked.
"Like it? No. I LOVE IT!" was his response.


The card stock is textured More Mustard. The purple  $ and 3 are Rich Razzleberry. The 2 and the text box are a patterned paper that was in a very old Christmas stack. The doily is from the $1 store and the tickets are from the theater.

Happy Crafting,

Sunday, January 2, 2011

It's all about words

Today's post is all about words.
Translated words. My one word. Words I wish I'd never heard.

Asking Google "How many English words are there?" will get you to the Oxford Dictionaries site and you will learn:
"...that there are, at the very least, a quarter of a million distinct English words, excluding inflections, and words from technical and regional vocabulary not covered by the OED, or words not yet added to the published dictionary, of which perhaps 20 per cent are no longer in current use. If distinct senses were counted, the total would probably approach three quarters of a million."

Interesting Translation
I am not a world traveler (though I would love to see more of the world this year) but I have friends who are originally from other countries and they go back to visit friends and relatives from time to time. When they return they often have plastic bags from purchases made in their home countries. Last week a bag from Japan made its way into my home. The bag is from Tokyo Banana. I did a Google search and found Super Merlion.com which describes Tokyo Banana as:
"...a series of banana flavored sweets that are often considered to be the
#1 souvenir of choice to be given out as gifts by friends who have recently
visited Japan. Tokyo Banana basically are banana flavored custard cakes
meticulously wrapped and packaged in Japanese standards"

 I love reading packaging from other countries, especially when it contains translations.

< Here is the English translation found on the bag:

I like trying to figure out how to rewrite translations so they read better in English. This is a pretty good translation, you can figure out the message fairly easily. 
But this bit of text was not the reason I was drawn to the bag after it's contents were removed.

I love the designs on the bag. Fruit wearing head gear. 
A banana in bow, a strawberry in a boater. So stinkin' cute.

Click to see larger.


One Word - 2011
I was introduced to the idea of One Little Word a couple of years ago on the Ali Edward's Blog. I chose the word Light last year (see my post on that here: one little word). This year I learned that there is a similar program called My One Word started at the same time (2007) in the Port City Church in Wilmington, NC. They even have a website called My One Word. The video on the word "WAIT" is so powerful, it makes me want to choose it as my own word.

The last couple of years I agonized over my choice. It's daunting when there are three quarters of a million words to choose from. Plus new words are added to the lexicon every so often by imaginative writers. Twenty years ago the word Quiddich didn't exist and now college kids are doing their best to play this wizarding world game, sans flying of course.

My first thought for a Word for 2011 was BEGIN because I know I will begin so many things this year. I will begin classes. I will begin a job, eventually. I hope I will begin relationships that will last years. Begin is a good word. But I know I have begun many things that I have not finished. 

I think a better word is COMPLETE. I like words with more than one meaning. Complete means finish making or doing and it means having all the necessary or appropriate parts. I need to finish more of what I begin but I also want to live a balanced life being complete, and lacking nothing.

Kimberly Geswein chose Joy as her family's word for 2011 and listed several scriptures showing what a great word it was. I liked that so I will follow her lead:
James 1:4   Let perseverance finish its work so that you may be mature and complete, not lacking anything.
John 16:24   Until now you have not asked for anything in my name. Ask and you will receive, and your joy will be complete.
Yes COMPLETE is a better word than BEGIN or QUIDDICH.

Words I wish I'd never heard.

Originally uttered 75 years ago.
"All for one."
"And one for all."
"Every man for himself."

Yes it's the 3 stooges and my son is in love with them. The new station in town showed the Stooges ALL DAY LONG today. What a way to kick off a year and a station. He has seen far too many shorts and is starting to quote them. The above quote was uttered numerous times today because he thought it was the funniest thing he'd ever heard.

Tomorrow will be about the scrapping, I promise.

Happy Crafting,